Enable PQC link encryption with MACsec#
| Activity name | Enable PQC link encryption with MACsec |
| Activity ID | 51 |
| Short Description | With the rise of global cyber-attacks compromising sensitive data and critical services, governments, security institutions, telecommunications regulators, and CSPs are prioritizing robust, future-proof communications. You are part of a CSP’s IP Network team tasked with deploying Post-Quantum Cryptography (PQC) encryption on-demand for critical network links in a Nokia FP5-based network utilizing MACsec capabilities. In this activity, you will enable link level PQC encryption between two routers, using gNMIc for automated deployment (creating, deleting, or toggling encryption) and observing the encrypted traffic on the line to ensure point-to-point security. |
| Difficulty | Beginner |
| Tools used | Containerlab VS Code Extension MD-CLI Explorer Nokia YANG Browser EdgeShark Wireshark gNMIc |
| Topology Nodes | PE1, PE2, P1, P2, Client01, Client02 |
| References | Interface configuration guide – MACsec MD-CLI Command Reference - MACsec IP Network Security Nokia FP5 security |
1. Objective#
With the rise of global cyber-attacks compromising sensitive data and critical services, governments, security institutions, telecommunications regulators, and CSPs are prioritizing robust, future-proof communications.
You are part of a CSP’s IP Network team tasked with deploying Post-Quantum Cryptography (PQC) encryption on-demand for critical network links in a Nokia FP5-based network utilizing MACsec capabilities.
In this activity, you will enable link level PQC encryption between two routers, using gNMIc for automated deployment (creating, deleting, or toggling encryption) and observing the encrypted traffic on the line to ensure point to point security.
You will configure the links between PE1, P1, P2 and PE2 to protect data between Client01 and Client02 services.
The Fig. 1. below highlights the FP5 PEs and clients that will be used in this activity:
You will start by using the MD-CLI to familiarize yourself with MACsec configurations and then use gnmic for automation.
A summary of the tasks you will execute (don't start yet!) are:
- Capture clear-text packets
- Test connectivity between Client01 and Client02 and use EdgeShark to observe the traffic is flowing in clear text.
- Configure MACsec
- Explore SR OS MACsec MD-CLI commands and configure MACsec in the links between PE1 and P1 and between P1 and PE2.
- Capture encrypted packets
- Use EdgeShark to verify that traffic on the links between PE1 and the P routers is being encrypted.
- Automate MACsec with gNMIc
- Create a gNMIc scripts to enable MACsec on a given link between two nodes.
- Toggle MACsec with gNMIc
- Enhance your gNMIc script to allow toggling MACsec on a given link. This script can be useful for troubleshooting network issues.
- Validate the gNMIc script
- Use EdgeShark to observe the traffic on the line while you toggle MACsec with your script.
In summary, you will explore MACsec configurations, analyze its encryption and authentication mechanisms, and understand its role in quantum-safe security strategies.
2. Technology explanation#
MACsec: A scalable and high-performance PQC data encryption solution
MACsec (Media Access Control Security) is a well-established technology, with its initial standard published in 2006. Over the past two decades, MACsec has evolved through complementary standards and enhancements, making it a robust solution for Ethernet security.
With the advent of quantum computing, the demand for quantum-safe solutions has grown significantly. MACsec has gained renewed attention as it is considered a quantum-safe technology, providing line-rate, hardware-based encryption, data integrity, and confidentiality for Ethernet links. Key applications include securing Anyhaul links, data center "east-west" traffic, protecting sensitive WAN/MAN links, enabling secure, high-speed campus networks, and securing Industrial IoT (IIoT) or surveillance systems.
MACsec is a Layer 2 security protocol standardized by the IEEE under 802.1AE, designed to secure Ethernet communications on a per-link basis.
It provides confidentiality, data integrity, and origin authentication by encrypting and authenticating Ethernet frames, while also protecting against replay attacks through packet numbering. MACsec operates transparently to higher-layer protocols and is typically used between directly connected devices such as switches and routers.
Key management is handled via 802.1X in conjunction with the MACsec Key Agreement (MKA) protocol, enabling dynamic establishment and rotation of encryption keys.
Overall, MACsec delivers high-performance, low-latency link-layer security, and its quantum-safe, making it well suited for securing traffic within data center and service provider networks.
3. Lab topology overview#
For this activity we will focus on a subset of the main topology considering only the SR OS Provider Edge (PE), the Provider (P) routers and clients. The PE1, P1, P2 and PE2 nodes are FP5-based and will be configured with MACsec to provide quantum-safe transport between Client01 and Client02, as illustrated in Fig. 2. below:
The network is already configured with IGP, MPLS, BGP and several existing services. In the following tasks you will add additional configuration to enable MACsec on specific network links.
4. Tasks#
You should read these tasks from top-to-bottom before beginning the activity.
It is tempting to skip ahead but tasks may require you to have completed previous tasks before tackling them.
4.1 Disable backup and redundant links#
There is a low bandwidth backup link between PE1 and PE2 (represented in Fig.1 above). For this activity we want to ensure this link is not used, and it must be disabled with the commands below. You must restore it at the end (we've included this step in the Final Cleanup tasks).
Mandatory: Disable the backup link between PE1 port 1/1/c8/1 and PE2 port pe2:1/1/c5/1
Execute the following gnmic commands from your hackathon instance.
### "pe1:1/1/c8/1" to "pe2:1/1/c5/1"
gnmic -a clab-srexperts-pe1 -u admin -p $EVENT_PASSWORD --insecure set \
    --update-path '/configure/port[port-id=1/1/c8/1]/admin-state' --update-value disable
gnmic -a clab-srexperts-pe2 -u admin -p $EVENT_PASSWORD --insecure set \
    --update-path '/configure/port[port-id=1/1/c5/1]/admin-state' --update-value disable
Optionally, you may also disable the redundant links between PE1 and P2 and between PE2 to P2 to ensure packets flow always through P1 links.
Optional: Disabling redundant links to focus the traffic routing on a specific path.
If you decide to disable the links, you should restore them at the end (we've included this step in the Final Cleanup tasks).
Execute the following gnmic commands from your hackathon instance.
###  "pe1:1/1/c2/1" to  p2:1/1/c1/1"
gnmic -a clab-srexperts-pe1 -u admin -p $EVENT_PASSWORD --insecure set \
    --update-path '/configure/port[port-id=1/1/c2/1]/admin-state' --update-value disable
gnmic -a clab-srexperts-p2 -u admin -p $EVENT_PASSWORD --insecure set \
    --update-path '/configure/port[port-id=1/1/c1/1]/admin-state' --update-value disable

###  "pe2:1/1/c2/1" to "p2:1/1/c2/1"
gnmic -a clab-srexperts-pe2 -u admin -p $EVENT_PASSWORD --insecure set \
    --update-path '/configure/port[port-id=1/1/c2/1]/admin-state' --update-value disable
gnmic -a clab-srexperts-p2 -u admin -p $EVENT_PASSWORD --insecure set \
    --update-path '/configure/port[port-id=1/1/c2/1]/admin-state' --update-value disable
4.2 Capture clear-text packets#
In this task you'll test connectivity between Client01 and Client02 and use EdgeShark to observe the traffic is flowing in clear text.
There's already a VLL service configured between PE1 and PE2 as illustrated in Fig. 3. below:
In this task you will:
- Validate that the SDPs are up on both PES
- Validate the VLL service is up
- Test connectivity between Client01 and Client02
- Use EdgeShark to observe the traffic is flowing in clear text over the network links
Note
Currently SR-SIM packet captures only display ingress packets.
Optionally, if you would like to see both directions you may also capture PE1 interface 1/1/c6/1 or the interface on PE2.
4.2.1 Validate the SDPs#
Validate that the SDP is up at both PEs.
If you're not familiar with the concept of SDP (Service destination points), you may refer to the Services Overview Guide - SDP section.
Solution to validate the SDPs
[/]
A:admin@g15-pe1# show service sdp

============================================================================
Services: Service Destination Points
============================================================================
SdpId  AdmMTU  OprMTU  Far End          Adm  Opr         Del     LSP   Sig
----------------------------------------------------------------------------
1222   0       8642    10.46.15.22      Up   Up          MPLS    I     TLDP
----------------------------------------------------------------------------
Number of SDPs : 1
----------------------------------------------------------------------------
Legend: R = RSVP, L = LDP, B = BGP, M = MPLS-TP, n/a = Not Applicable
        I = SR-ISIS, O = SR-OSPF, T = SR-TE, F = FPE
============================================================================

[/]
A:admin@g15-pe1#
[/]
A:admin@g15-pe1# show service sdp detail

===============================================================================
Services: Service Destination Points Details
===============================================================================
-------------------------------------------------------------------------------
 Sdp Id 1222  -10.46.15.22
-------------------------------------------------------------------------------
Description           : To PE2 - Epipe using ISIS 0
SDP Id               : 1222                  SDP Source         : manual
Admin Path MTU       : 0                     Oper Path MTU      : 8642
Delivery             : MPLS
Far End              : 10.46.15.22           Tunnel Far End     : n/a
Oper Tunnel Far End  : 10.46.15.22
LSP Types            : SR-ISIS

Admin State          : Up                    Oper State         : Up
Signaling            : TLDP                  Metric             : 0
Acct. Pol            : None                  Collect Stats      : Disabled
Last Status Change   : 05/03/2025 07:50:41   Adv. MTU Over.     : No
Last Mgmt Change     : 05/03/2025 01:32:20   VLAN VC Etype      : 0x8100
Bw BookingFactor     : 100                   PBB Etype          : 0x88e7
Oper Max BW(Kbps)    : 0                     Avail BW(Kbps)     : 0
Net-Domain           : default               Egr Interfaces     : Consistent
FPE LSP Id           : 0
Weighted ECMP        : Disabled
Flags                : None

Mixed LSP Mode Information :
Mixed LSP Mode       : Disabled              Active LSP Type    : SR-ISIS

KeepAlive Information :
Admin State          : Disabled              Oper State         : Disabled
Hello Time           : 10                    Hello Msg Len      : 0
Hello Timeout        : 5                     Unmatched Replies  : 0
Max Drop Count       : 3                     Hold Down Time     : 10
Tx Hello Msgs        : 0                     Rx Hello Msgs      : 0

Src B-MAC LSB        : <none>                Ctrl PW VC ID      : <none>
Ctrl PW Active       : n/a

-------------------------------------------------------------------------------
RSVP/Static LSPs
-------------------------------------------------------------------------------
Associated LSP List :
No LSPs Associated

-------------------------------------------------------------------------------
Class-based forwarding :
-------------------------------------------------------------------------------
Class forwarding     : Disabled              EnforceDSTELspFc   : Disabled
Default LSP          : Uknwn
Multicast LSP        : None

===============================================================================
FC Mapping Table
===============================================================================
FC Name             LSP Name
-------------------------------------------------------------------------------
No FC Mappings

-------------------------------------------------------------------------------
Segment Routing
-------------------------------------------------------------------------------
ISIS                 : enabled               LSP Id             : 524309
Oper Instance Id     : 0
OSPF                 : disabled
TE-LSP               : disabled
-------------------------------------------------------------------------------
Number of SDPs : 1
-------------------------------------------------------------------------------
===============================================================================

[/]
A:admin@g15-pe1#
Note
Note: You may inspect the configurations or configure other SDPs and other services to other PEs.
SDP configurations
These are the required SDP parameters:
This is the SDP template and configurations:
4.2.2 Validate the VLL service#
Confirm that the VLL service 1001 is active and healthy.
Solution to validate the VLL service
(gl)[/]
A:admin@g15-pe1# show service service-using epipe

===============================================================================
Services [epipe]
===============================================================================
ServiceId    Type      Adm  Opr  CustomerId Service Name
-------------------------------------------------------------------------------
1001          Epipe     Up   Up   1          anysec-vll-1001
-------------------------------------------------------------------------------
Matching Services : 1
-------------------------------------------------------------------------------
===============================================================================

(gl)[/]
A:admin@g15-pe1#
(gl)[/]
A:admin@g15-pe1# show service id 1001 base

===============================================================================
Service Basic Information
===============================================================================
Service Id        : 1001                 Vpn Id            : 0
Service Type      : Epipe
MACSec enabled    : no
Name              : anysec-vll-1001
Description       : Epipe using ISIS 0
Customer Id       : 1                   Creation Origin   : manual
Last Status Change: 05/09/2025 14:12:48
Last Mgmt Change  : 05/09/2025 14:12:48
Test Service      : No
Admin State       : Up                  Oper State        : Up
MTU               : 8100
Vc Switching      : False
SAP Count         : 1                   SDP Bind Count    : 1
Per Svc Hashing   : Disabled            Lbl Eth/IP L4 TEID: Disabled
Ignore MTU Mismat*: Disabled
Vxlan Src Tep Ip  : N/A
Force QTag Fwd    : Disabled
Lcl Switch Svc St : sap
Oper Group        : <none>

-------------------------------------------------------------------------------
Service Access & Destination Points
-------------------------------------------------------------------------------
Identifier                               Type         AdmMTU  OprMTU  Adm  Opr
-------------------------------------------------------------------------------
sap:1/1/c6/1:1001                         q-tag        8704    8704    Up   Up
sdp:1222:1001 S(10.46.23.22)              Spok         0       8678    Up   Up
===============================================================================
* indicates that the corresponding row element may have been truncated.

(gl)[/]
A:admin@g15-pe1#
Note
Note: You may inspect the configurations or configure other VLL services to other PEs.
VLL configuration
These are the required VLL parameters.
This is the VLL template and configurations for both PEs.
4.2.3 Test connectivity#
Now that you have validated that the network service is up and running, you need to test end-to-end connectivity between Client01 (192.168.51.1) and Client02 (192.168.51.2).
The client nodes Client01 and Client02 are connected to their respective Provider Edge (PE) node on interface eth1, sub-interface eth1.1001, vlan 1001 and subnet 192.168.51.0/24.
Validate the interface configuration on each client host and verify the connectivity between the hosts.
Solution to validate client connectivity
These are the client interface validation examples and ICMP test expected output
[*]─[client01]─[/]
└──> ip addr show eth1.1001
5: eth1.1001@eth1: <BROADCAST,MULTICAST,UP,LOWER_UP> mtu 9500 qdisc noqueue state UP group default qlen 1000
    link/ether aa:c1:ab:96:3a:35 brd ff:ff:ff:ff:ff:ff
    inet 192.168.51.1/24 scope global eth1.1001
       valid_lft forever preferred_lft forever
    inet6 fe80::a8c1:abff:fe96:3a35/64 scope link
       valid_lft forever preferred_lft forever

[*]─[client01]─[/]
[*]─[client02]─[/]
└──> ip addr show eth1.1001
5: eth1.1001@eth1: <BROADCAST,MULTICAST,UP,LOWER_UP> mtu 9500 qdisc noqueue state UP group default qlen 1000
    link/ether aa:c1:ab:57:52:1b brd ff:ff:ff:ff:ff:ff
    inet 192.168.51.2/24 scope global eth1.1001
       valid_lft forever preferred_lft forever
    inet6 fe80::a8c1:abff:fe57:521b/64 scope link
       valid_lft forever preferred_lft forever

[*]─[client02]─[/]
bash# ping -c 2 192.168.51.2
PING 192.168.51.2 (192.168.51.2) 56(84) bytes of data.
64 bytes from 192.168.51.2: icmp_seq=1 ttl=64 time=10.5 ms
64 bytes from 192.168.51.2: icmp_seq=2 ttl=64 time=5.87 ms

--- 192.168.51.2 ping statistics ---
2 packets transmitted, 2 received, 0% packet loss, time 1001ms
rtt min/avg/max/mdev = 5.870/8.195/10.520/2.325 ms

bash#
Note
You may configure other interfaces on these or other PEs to test other services and links. Refer to the hint bellow for the procedure to add new sub-interfaces, VLANs and IP addresses.
Example to configure other client interfaces
These are the client configuration examples used in this setup.
4.2.4 Capture traffic options#
The final step in this task is to perform a network capture and confirm that the network traffic is flowing in clear text over the network links.
You may use the EdgeShark WEB UI directly with the URL: http://${INSTANCE_ID}.srexperts.net:5001
Note
The best tool for packet captures is Edgeshark WEB UI or the VSCode containerlab extension, but both requires you to install software in your laptop. If you cannot install software in your laptop, then you may use the TCPDump or Tshark instead.
For the EdgeShark WEB UI, you need Wireshark and to install the cshargextcap plugin to allow Edgeshark to open and stream captured packets to your local Wireshark.
For more details about the Containerlab packet capture options refer to tools guide Containerlab capture traffic .
Warning
Currently SR-SIM packet captures only display ingress packets.
You don't need to, but if you want to see both directions you may capture on both sides of a link.
4.3 Configure MACsec#
Before you continue with this activity and deploy configuration using gNMI, familiarize yourself with the SR OS MD-CLI MACsec configurations.
You will now explore the SR OS MACsec MD-CLI commands and configure MACsec on the links between PE1 and the Provider (P) routers.
Your team told you that the P routers ( P1 and P2) are already configured for MACsec and you should focus on PE1 configuration only.
The required steps to configure MACsec are:
- Define the Connectivity Association (CA) with Static Connectivity Association Key (CAK)
- Apply MACsec on the port
The following user-guides may provide some additional assistance:
4.3.1 Configure MACsec CA#
Your first task is to configure a connectivity-association on PE1. As stated above, the P1 and P2 were already configured by your team member.
Use the following parameters:
- CA name: "CA_MACSec"
- macsec-encrypt: true
- clear-tag-mode: none
- cipher-suite: gcm-aes-xpn-128
- active-psk: 1
- mka-hello-interval: 5
- PSK 1 and 2 encryption-type: aes-128-cmac
- PSK 1 cak-name: 0123456789ABCDEF0123456789ABCDEF
- PSK 1 cak: 0123456789ABCDEF0123456789ABCDEF
- PSK 2 cak-name: 123456789ABCDEF0123456789ABCDEF0
- PSK 2 cak: 123456789ABCDEF0123456789ABCDEF0
Validate the MACsec CA configuration.
The CA detail output will display the parameters configured, the admin-state, the pre-shared-key index and CAK name.
(gl)[/]
A:admin@g50-pe1# /show macsec connectivity-association "CA_MACSec" detail

===============================================================================
Connectivity Association "CA_MACSec"
===============================================================================
Admin State        : Up
Description        : MACSec CA
Delay Protection   : Disabled
Replay Protection  : Disabled
Replay Window Size : 0
Macsec Encrypt     : Enabled
Clear Tag Mode     : none
Cipher Suite       : gcm-aes-xpn-128
Encryption Offset  : 0
Assigned ports     : None

-------------------------------------------------------------------------------
Static Cak
-------------------------------------------------------------------------------
MKA Key Server Priority      : 16
Hello Interval               : 5
Active Pre-Shared-Key Index  : 1
Active Pre-Shared-Key CKN    : 0123456789ABCDEF0123456789ABCDEF
Encryption Type              : aes-128-cmac
Primary Keychain             : (Not Specified)
===============================================================================
Question: Do you need to configure two pre-shared keys per CA? Why this is needed?
No, you do not need to configure two pre-shared keys per CA. Only one PSK is required to establish a MACsec session. The second PSK is optional and exists to support hitless key rollover. Rolling-over your PSK periodically is a recommended security practice.
Hint: Template to configure a MACsec CA
This is a template to configure a MACsec CA:
configure {
    macsec {
        connectivity-association <CA name> {
            admin-state enable
            cipher-suite <cipher>
            #mka-hello-interval 5
            static-cak {
                pre-shared-key 1 {
                    encryption-type <enc-type>
                    cak <cak>
                    cak-name <cak-name>
                }
                pre-shared-key 2 {
                    encryption-type <enc-type>
                    cak <cak>
                    cak-name <cak-name>
                }
            }
        }
    }
}
commit
Solution to configure a MACsec CA
This is the MACsec CA configuration that should be the same on all routers.
When troubleshooting MACsec you should validate that there's no CAK value mismatch between routers.
configure {
    macsec {
        connectivity-association "CA_MACSec" {
            admin-state enable
            cipher-suite gcm-aes-xpn-128
            #mka-hello-interval 5
            static-cak {
                pre-shared-key 1 {
                    encryption-type aes-128-cmac
                    cak "0123456789ABCDEF0123456789ABCDEF"
                    cak-name "0123456789ABCDEF0123456789ABCDEF" # for testing only you can use the name equal to the cak
                }
                pre-shared-key 2 {
                    encryption-type aes-128-cmac
                    cak "123456789ABCDEF0123456789ABCDEF0"
                    cak-name "123456789ABCDEF0123456789ABCDEF0"  # for testing only you can use the name equal to the cak
                }
            }
        }
    }
}
commit
4.3.2 Apply MACsec on the Ports#
The final step on this task is to apply MACsec on the link ports:
- PE1:
1/1/c1/1to P1:1/1/c1/1 - PE1:
1/1/c2/1to P2:1/1/c1/1
You must configure PE1 only.
You may recall that your team told you that P1 and P2 are already configured.
Hint to configure and validate the MACsec port configuration
This is a CLI context to configure a MACsec on the port:
Validate the MACsec port configuration for both ports.
A:admin@g4-pe1# /show macsec mka-session detail port "1/1/c1/1"

===============================================================================
MKA Session for port 1/1/c1/1: sub-port 1 encap untagged
===============================================================================
Security Zone      : 1
CA Name            : CA_MACSec
CAK Name           : 0123456789abcdef0123456789abcdef
PSK Type           : static-cak-active-psk
MKA Oper State     : out-of-service
Oper Cipher Suite  : gcm-aes-128
Oper Encrypt Offset: 0
MKA Member ID      : 7dc640f90d9d89b25a0ad28a
Transmit Interval  : 2000
Outbound SCI       : aac1ab40afd50001
MKA Encapsulation  : untagged
Message Number     : 27
Key Number         : 0
Key Server         : no
Key Server Priority: 0
Latest SAK AN      : 0
Latest SAK KI      : 00000000000000000000000000000000
Latest SAK LPN     : 0
Latest SAK Rx      : no
Latest SAK Tx      : no
Previous SAK AN    : 0
Previous SAK KI    : 00000000000000000000000000000000
Previous SAK LPN   : 0
Previous SAK Rx    : no
Previous SAK Tx    : no
Principal Actor    : no
Encoding AN        : N/A
===============================================================================

===============================================================================
Live Peer List
===============================================================================
Member                   Message    Rx-SCI           LPN                  KS
Identifier               Number                                           Prio
-------------------------------------------------------------------------------
===============================================================================

===============================================================================
Potential Peer List
===============================================================================
Member                   Message    Rx-SCI           LPN                  KS
Identifier               Number                                           Prio
-------------------------------------------------------------------------------
===============================================================================

===============================================================================
MKA Session Statistics for port 1/1/c1/1: subport 1
===============================================================================
Peer Removed Due to Timeout  : 0
CKN Not Found                : 0
New Live peer                : 0
SAK Generated by Server      : 0
SAK Installed for TX         : 0
SAK Installed for RX         : 0
PDU Too Small                : 0
PDU Too Big                  : 0
PDU Not Quad Size            : 0
PDU Message Number Invalid   : 0
PDU Param Set Size Invalid   : 0
PDU Liveness Check Fail      : 0
Param Set Not Quad Size      : 0
Unsupported Agility          : 0
Invalid CAK Name Length      : 0
ICV Check Failed             : 0
Peer Using Same MID          : 0
SAK From Non-Live Peer       : 0
SAK From Non-Key Server      : 0
SAK Decrypt Fail             : 0
SAK Encrypt Fail             : 0
Key Number Invalid           : 0
SAK Installation Failed      : 0
CAK Info Missing             : 0
Max Peers Set as Zero        : 0
Invalid MKA Header           : 0
===============================================================================
Once you finish PE1 configurations, validate the MACsec port configuration and test the end-to-end connectivity.
Spoiler Alert : You may have to troubleshoot the configurations....
Question: After you implement all configurations, can you ping between clients and observe the packets?
No, if you follow all of the instructions it will not work because there is a configuration error or something missing.
Try to troubleshoot and identify what is wrong.
Solution to configure a MACsec on the ports
This is the MACsec port configuration:
configure {
    port 1/1/c1/1 {
        ethernet {
            dot1x {
                admin-state enable
                tunnel-dot1q false
                tunnel-qinq false
                macsec {
                    sub-port 1 {
                        admin-state enable
                        ca-name "CA_MACSec"
                        max-peers 5
                        encap-match {
                            all-match true
                        }
                    }
                }
            }
        }
    }
    port 1/1/c2/1 {
        ethernet {
            dot1x {
                admin-state enable
                tunnel-dot1q false
                tunnel-qinq false
                macsec {
                    sub-port 1 {
                        admin-state enable
                        ca-name "CA_MACSec"
                        max-peers 5
                        encap-match {
                            all-match true
                        }
                    }
                }
            }
        }
    }
}
commit
Hint to fix the error
Perhaps there is something wrong or missing with your team member's configuration on P1 and P2?
Log in and have a look.
Solution to fix the errors
Indeed, your team members left the macsec sub-port 1 with admin-state disable. This was not a mistake but intended, because MACsec must be enabled simultaneously on both sides of a link. So, they configured everything but, to avoid impact on the links, they left this configuration disabled. They forgot to tell you ...
You need to enable it at both P routers. You may find the configuration error and the command to fix it below.
MACsec is now configured and operational between PE1 and the Provider (P) routers.
4.4 Capture encrypted packets#
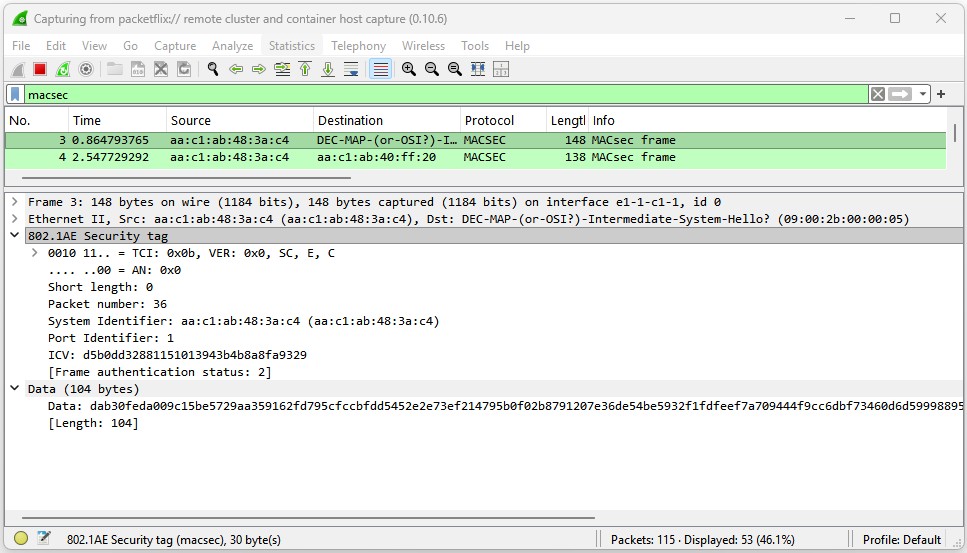
Now you will test end-to-end (E2E) connectivity and use EdgeShark (or one of the alternative methods) to verify that traffic on the link between PE1 and both P1 and P2 is being encrypted.
From Client01 start an ICMP to Client02:
Use EdgeShark (or another tool as described in section Capture traffic in clear to start a capture on PE1, interfaces 1/1/c1/1 and 1/1/c2/1.
Apply the display filter macsec or icmp and you should see your ICMP packets encrypted as show in Fig. 5 below:
4.5 Automate MACsec with gNMIc#
You have been requested to configure MACsec on the links from PE2 to the Provider (P) routers. How can you achieve that?
You have gone over the steps required to configure MACsec on a network link. This involved a significant amount of manual configuration that is quite sensitive to parameters and values being aligned between both sides of the link. For a real network with thousands of links you need to automate this process to avoid errors and improve efficiency.
In this task you will create a gNMI calls using the gnmic tool to enable MACsec on a given link between two nodes. You may use the Nokia YANG Browser to find the YANG path or you may derive it from the node CLI (using the pwc gnmi-path command) or using the SR OS MD-CLI explorer tool.
Your new task is to build gNMI calls that can do the following:
- Retrieve the MACsec CA and port configurations present on a given system in JSON format using the
gnmictool and thegetparameter - Create the MACsec CA and configure MACsec under the ports on two nodes using the
gnmictool and thesetparameter - Using the clients and the packet inspection techniques seen previously, make sure your calls have the expected result.
- Remove the MACsec port configuration on a link between two nodes
The gnmic client has been pre-installed on your group's hackathon instance and the example solution will presume this is the environment you use. You are free to install gnmic on your local machine using the instructions available online if you are able.
Use the gNMIc documentation to figure out how you can retrieve data from remote systems and provide inputs and data-structures to the tool when making changes.
Insecure mode gRPC
When using gNMIc in the following sections you will notice that the gRPC server in the model-driven SR OS nodes in the Hackathon topology is set to insecure mode. This is only suitable for a lab environment and should be changed to TLS-secured mode for any live or production environment. If this is something you would like to learn how to do, there is an activity in this years hackathon for this that you could complete once you've finished this one.
4.5.1 gNMI get#
Before we start configuring the routers, let's get started with gnmic in read-only mode. Use the gNMI Get RPC to retrieve the MACsec CA configuration from PE1 using the gnmic tool and store the configuration in a JSON file. Use the gnmic get parameter again to retrieve the MACsec port configuration from PE1 port 1/1/c1/1 to another json file.
Hint - How to discover the YANG path?
You may derive the YANG path from the node MD-CLI context, or using the pwc gnmi-path under the context you need to get the exact path.
You may use also the Nokia YANG Browser tool.
(gl)[/configure port 1/1/c1/1 ethernet dot1x]
A:admin@g50-pe1# info
    admin-state enable
    tunnel-dot1q false
    tunnel-qinq false
    macsec {
        sub-port 1 {
            admin-state enable
            ca-name "CA_MACSec"
            max-peers 5
            encap-match {
                all-match true
            }
        }
    }
    per-host-authentication {
        admin-state disable
    }

2026-03-27T17:27:24.20+00:00
(gl)[/configure port 1/1/c1/1 ethernet dot1x]
A:admin@g50-pe1#
Solution
These are the examples for retrieving the MACsec CA and port configurations using gNMIc Get RPC.
$ cat /tmp/macsec_ca_get.json
[
  {
    "source": "clab-srexperts-pe1",
    "timestamp": 1777488198940109168,
    "time": "2026-04-29T14:43:18.940109168-04:00",
    "updates": [
      {
        "Path": "configure/macsec/connectivity-association[ca-name=CA_MACSec]",
        "values": {
          "configure/macsec/connectivity-association": {
            "admin-state": "enable",
            "ca-name": "CA_MACSec",
            "cipher-suite": "gcm-aes-xpn-128",
            "static-cak": {
              "pre-shared-key": [
                {
                  "cak": "Ij4KFgr52goD5t0sRxnFbxR2LLnlrR5S9Rm2WnxX6T4= hash2",
                  "cak-name": "0123456789ABCDEF0123456789ABCDEF",
                  "encryption-type": "aes-128-cmac",
                  "psk-id": 1
                },
                {
                  "cak": "/IwniHt7rQ7/pNhy8BM4lzDOMcq8AXWZ9V9YVJPFq4c= hash2",
                  "cak-name": "123456789ABCDEF0123456789ABCDEF0",
                  "encryption-type": "aes-128-cmac",
                  "psk-id": 2
                }
              ]
            }
          }
        }
      }
    ]
  }
]
$ cat /tmp/macsec_port_get.json
[
  {
    "source": "clab-srexperts-pe1",
    "timestamp": 1777488251684552413,
    "time": "2026-04-29T14:44:11.684552413-04:00",
    "updates": [
      {
        "Path": "configure/port[port-id=1/1/c1/1]/ethernet/dot1x",
        "values": {
          "configure/port/ethernet/dot1x": {
            "admin-state": "enable",
            "macsec": {
              "sub-port": [
                {
                  "admin-state": "enable",
                  "ca-name": "CA_MACSec",
                  "encap-match": {
                    "all-match": true
                  },
                  "max-peers": 5,
                  "sub-port-id": 1
                }
              ]
            },
            "tunnel-dot1q": false,
            "tunnel-qinq": false
          }
        }
      }
    ]
  }
]
4.5.2 gNMI set#
Use the JSON files from the previous sections as reference and create the configuration file to create a MACsec CA and configure MACsec under the ports.
Hint
This is the template you will use for the gnmic tools set parameter. The JSON files must contain only the values section from the output retrieved with the GETs before.
Solution MACsec CA
The following are JSON file and gNMIc examples for creating the MACsec CA using the gNMI Set RPC. The configuration is the same in every router and must be applied to PE2, P1 and P2.
  {
    "admin-state": "enable",
    "ca-name": "CA_MACSec",
    "cipher-suite": "gcm-aes-xpn-128",
    "static-cak": {
      "pre-shared-key": [
        {
          "cak": "Ij4KFgr52goD5t0sRxnFbxR2LLnlrR5S9Rm2WnxX6T4= hash2",
          "cak-name": "0123456789ABCDEF0123456789ABCDEF",
          "encryption-type": "aes-128-cmac",
          "psk-id": 1
        },
        {
          "cak": "/IwniHt7rQ7/pNhy8BM4lzDOMcq8AXWZ9V9YVJPFq4c= hash2",
          "cak-name": "123456789ABCDEF0123456789ABCDEF0",
          "encryption-type": "aes-128-cmac",
          "psk-id": 2
        }
      ]
    }
  }
From your hackathon instance apply the following configuration using gnmic to PE2, P1 and P2. Note that the same gnmic will create distinct calls for the three nodes.
$ gnmic -a clab-srexperts-pe2 -a clab-srexperts-p1 -a clab-srexperts-p2 -u admin -p $EVENT_PASSWORD --insecure set \
    --update-path '/configure/macsec/connectivity-association[ca-name=CA_MACSec]' \
    --update-file /tmp/macsec_ca_set.json
[p2] {
[p2]   "source": "p2",
[p2]   "timestamp": 1778628384853343479,
[p2]   "time": "2026-05-12T23:26:24.853343479Z",
[p2]   "results": [
[p2]     {
[p2]       "operation": "UPDATE",
[p2]       "path": "configure/macsec/connectivity-association[ca-name=CA_MACSec]"
[p2]     }
[p2]   ]
[p2] }
[pe2] {
[pe2]   "source": "pe2",
[pe2]   "timestamp": 1778628384854296593,
[pe2]   "time": "2026-05-12T23:26:24.854296593Z",
[pe2]   "results": [
[pe2]     {
[pe2]       "operation": "UPDATE",
[pe2]       "path": "configure/macsec/connectivity-association[ca-name=CA_MACSec]"
[pe2]     }
[pe2]   ]
[pe2] }
[p1] {
[p1]   "source": "p1",
[p1]   "timestamp": 1778628384854766247,
[p1]   "time": "2026-05-12T23:26:24.854766247Z",
[p1]   "results": [
[p1]     {
[p1]       "operation": "UPDATE",
[p1]       "path": "configure/macsec/connectivity-association[ca-name=CA_MACSec]"
[p1]     }
[p1]   ]
[p1] }
Solution MACsec port configuration
The following are JSON file and gNMIc examples for creating the MACsec port configurations using the gNMI Set RPC.
From your hackathon instance apply the following configuration using gnmic to PE2, P1 and P2. Note that the same json file is use for all nodes, but since the gnmi path is distinct, you should use distinct calls for the three nodes.
4.5.3 Capture encrypted packets#
Again, use EdgeShark or another tool as described in section Capture traffic in clear to start a capture on PE2 for ports 1/1/c1/1 and 1/1/c2/1.
Apply the display filter macsec or icmp and you should see your ICMP packets encrypted.
Leave the capture running for the next section.
4.5.4 gNMI delete#
You have receive a call reporting that some services on PE2 are having issues. You are investigating and despite your belief that it is not related to the MACsec activation, you decide to disable MACsec to troubleshoot the issue.
Your new task is to use the gnmic tool with the set parameter to remove the MACsec port configuration on PE2, P1 and P2.
Note
Leave the configuration on the links between PE1 and the Provider (P) routers.
Solution
The example solution for deleting a service makes use of the Set RPC.
# PE2 - gNMIc set to delete MACsec port configuration
gnmic -a clab-srexperts-pe2 -u admin -p $EVENT_PASSWORD --insecure set \
    --delete '/configure/port[port-id=1/1/c1/1]/ethernet/dot1x' \
    --delete '/configure/port[port-id=1/1/c2/1]/ethernet/dot1x'
Verify on PE2's capture that after removing the MACsec port configuration, the ping commands are now working with ICMP traffic flowing in clear-text. Now you can now proceed with the reported network issue investigation.
4.6 Toggle MACsec using gnmic#
You have successfully identified and solved the reported issues, and despite it not being related to your MACsec configurations, it was quite useful to disable MACsec on the links to troubleshoot. You realize that it is very useful to have automation that allows you to disable and enable MACsec on-demand for troubleshooting.
Your next task is to create a MACsec toggle script.
Question: The approach you followed before was to remove the MACsec port configuration, and now you have to configure it again. Is there a better way?
Yes. You don't need to remove the full dot1x context from the port configuration. To temporarily disable MACsec on a link between two routers you have two options:
- Disable the MACsec Sub-port (Port Level)
- Disable the Connectivity Association (CA Level)
Now enhance your gnmic calls to allow toggling MACsec on a given link. It must allow you to update both sides of the link simultaneously, enabling or disabling MACsec with minimum impact. Note that this operation has always some impact, so it should be performed in a maintenance window.
Use the links between PE1 and P1 and between PE1 and P2.
Hint to retrieve the gNMI path to toggle MACsec
Find below the gnmic template to toggle MACsec. You need to find the gnmi-path to update and build the toggle logic.
Note that the path returned does not contain a "/" at the beginning!!
gnmic -a clab-srexperts-pe1 -u admin -p $EVENT_PASSWORD --insecure getset \
    --get '/configure/port[port-id=1/1/c1/1]/ethernet/dot1x/macsec/sub-port[sub-port-id=1]/admin-state' \
    --condition 'true' \
    --update '.[0].updates[0].Path' \
    --value '.[0].updates[0].values["<PATH RETURNED BY THE GET>"] | <LOGIC>'
Note that the path returned does not contain a "/" at the beginning!!
$ gnmic -a clab-srexperts-pe1 -u admin -p $EVENT_PASSWORD --insecure get \
--path '/configure/port[port-id=1/1/c1/1]/ethernet/dot1x/macsec/sub-port[sub-port-id=1]/admin-state' | grep -e enable -e disable
"configure/port/ethernet/dot1x/macsec/sub-port/admin-state": "enable"
Full output:
$ gnmic -a clab-srexperts-pe1 -u admin -p $EVENT_PASSWORD --insecure get \
--path '/configure/port[port-id=1/1/c1/1]/ethernet/dot1x/macsec/sub-port[sub-port-id=1]/admin-state'
[
{
"source": "pe1",
"timestamp": 1778631733917400627,
"time": "2026-05-13T00:22:13.917400627Z",
"updates": [
{
"Path": "configure/port[port-id=1/1/c1/1]/ethernet/dot1x/macsec/sub-port[sub-port-id=1]/admin-state",
"values": {
"configure/port/ethernet/dot1x/macsec/sub-port/admin-state": "enable"
}
}
]
}
]
Solution
The example solution makes use of the Get and GetSet RPC.
Start by retrieving the status for all ports. Then toggle MACsec for both links and observe the packet capture.
gnmic -a clab-srexperts-pe1 -u admin -p $EVENT_PASSWORD --insecure get \
--path '/configure/port[port-id=1/1/c1/1]/ethernet/dot1x/macsec/sub-port[sub-port-id=1]/admin-state' | grep -e enable -e disable
gnmic -a clab-srexperts-pe1 -u admin -p $EVENT_PASSWORD --insecure get \
--path '/configure/port[port-id=1/1/c2/1]/ethernet/dot1x/macsec/sub-port[sub-port-id=1]/admin-state' | grep -e enable -e disable
gnmic -a clab-srexperts-p1 -u admin -p $EVENT_PASSWORD --insecure get \
--path '/configure/port[port-id=1/1/c1/1]/ethernet/dot1x/macsec/sub-port[sub-port-id=1]/admin-state' | grep -e enable -e disable
gnmic -a clab-srexperts-p2 -u admin -p $EVENT_PASSWORD --insecure get \
--path '/configure/port[port-id=1/1/c1/1]/ethernet/dot1x/macsec/sub-port[sub-port-id=1]/admin-state' | grep -e enable -e disable
Find bellow the required set call. Since the port is the same on both nodes, and consequently the gnmi path, you may use a single gnmic command with both targets.
Single gnmic with RPC calls to both nodes:
gnmic -a clab-srexperts-pe1 -a clab-srexperts-p1 -u admin -p $EVENT_PASSWORD --insecure getset \
--get '/configure/port[port-id=1/1/c1/1]/ethernet/dot1x/macsec/sub-port[sub-port-id=1]/admin-state' \
--condition 'true' \
--update '.[0].updates[0].Path' \
--value '.[0].updates[0].values["configure/port/ethernet/dot1x/macsec/sub-port/admin-state"] | if contains("disable") then "enable" else "disable" end'
Below you will find the required calls. Since the port is distinct on both nodes, and consequently on different gnmi-paths, you will need distinct gnmic calls. You may chain both commands (with && ) or create a script.
gnmic -a clab-srexperts-pe1 -u admin -p $EVENT_PASSWORD --insecure getset \
--get '/configure/port[port-id=1/1/c2/1]/ethernet/dot1x/macsec/sub-port[sub-port-id=1]/admin-state' \
--condition 'true' \
--update '.[0].updates[0].Path' \
--value '.[0].updates[0].values["configure/port/ethernet/dot1x/macsec/sub-port/admin-state"] | if contains("disable") then "enable" else "disable" end'
gnmic -a clab-srexperts-p2 -u admin -p $EVENT_PASSWORD --insecure getset \
--get '/configure/port[port-id=1/1/c1/1]/ethernet/dot1x/macsec/sub-port[sub-port-id=1]/admin-state' \
--condition 'true' \
--update '.[0].updates[0].Path' \
--value '.[0].updates[0].values["configure/port/ethernet/dot1x/macsec/sub-port/admin-state"] | if contains("disable") then "enable" else "disable" end'
Toggle script
You may combine all the commands above in a single toggle script file to make it easier to execute. You may create your own script or use the one available at ~/SReXperts/activities/activity-51/toggle_macsec.sh.
### Print the status before
echo "status before"
gnmic -a clab-srexperts-pe1 -u admin -p $EVENT_PASSWORD --insecure get \
    --path '/configure/port[port-id=1/1/c1/1]/ethernet/dot1x/macsec/sub-port[sub-port-id=1]/admin-state' | grep -e enable -e disable
gnmic -a clab-srexperts-pe1 -u admin -p $EVENT_PASSWORD --insecure get \
    --path '/configure/port[port-id=1/1/c2/1]/ethernet/dot1x/macsec/sub-port[sub-port-id=1]/admin-state' | grep -e enable -e disable
gnmic -a clab-srexperts-p1 -u admin -p $EVENT_PASSWORD --insecure get \
    --path '/configure/port[port-id=1/1/c1/1]/ethernet/dot1x/macsec/sub-port[sub-port-id=1]/admin-state' | grep -e enable -e disable
gnmic -a clab-srexperts-p2 -u admin -p $EVENT_PASSWORD --insecure get \
    --path '/configure/port[port-id=1/1/c1/1]/ethernet/dot1x/macsec/sub-port[sub-port-id=1]/admin-state' | grep -e enable -e disable
### Toggle macsec for both links
echo "Toggle macsec for both links"
### PE1 to P1 link
echo "Toggle PE1 to P1 link"
gnmic -a clab-srexperts-pe1 -a clab-srexperts-p1 -u admin -p $EVENT_PASSWORD --insecure getset \
    --get '/configure/port[port-id=1/1/c1/1]/ethernet/dot1x/macsec/sub-port[sub-port-id=1]/admin-state' \
    --condition 'true' \
    --update '.[0].updates[0].Path' \
    --value '.[0].updates[0].values["configure/port/ethernet/dot1x/macsec/sub-port/admin-state"] | if contains("disable") then "enable" else "disable" end'
### PE1 to P2 link
echo "PE1 to P2 link"
gnmic -a clab-srexperts-pe1 -u admin -p $EVENT_PASSWORD --insecure getset \
    --get '/configure/port[port-id=1/1/c2/1]/ethernet/dot1x/macsec/sub-port[sub-port-id=1]/admin-state' \
    --condition 'true' \
    --update '.[0].updates[0].Path' \
    --value '.[0].updates[0].values["configure/port/ethernet/dot1x/macsec/sub-port/admin-state"] | if contains("disable") then "enable" else "disable" end'

gnmic -a clab-srexperts-p2 -u admin -p $EVENT_PASSWORD --insecure getset \
    --get '/configure/port[port-id=1/1/c1/1]/ethernet/dot1x/macsec/sub-port[sub-port-id=1]/admin-state' \
    --condition 'true' \
    --update '.[0].updates[0].Path' \
    --value '.[0].updates[0].values["configure/port/ethernet/dot1x/macsec/sub-port/admin-state"] | if contains("disable") then "enable" else "disable" end'
### Print the status after
echo "status after"
gnmic -a clab-srexperts-pe1 -u admin -p $EVENT_PASSWORD --insecure get \
--path '/configure/port[port-id=1/1/c1/1]/ethernet/dot1x/macsec/sub-port[sub-port-id=1]/admin-state' | grep -e enable -e disable
gnmic -a clab-srexperts-pe1 -u admin -p $EVENT_PASSWORD --insecure get \
--path '/configure/port[port-id=1/1/c2/1]/ethernet/dot1x/macsec/sub-port[sub-port-id=1]/admin-state' | grep -e enable -e disable
gnmic -a clab-srexperts-p1 -u admin -p $EVENT_PASSWORD --insecure get \
--path '/configure/port[port-id=1/1/c1/1]/ethernet/dot1x/macsec/sub-port[sub-port-id=1]/admin-state' | grep -e enable -e disable
gnmic -a clab-srexperts-p2 -u admin -p $EVENT_PASSWORD --insecure get \
--path '/configure/port[port-id=1/1/c1/1]/ethernet/dot1x/macsec/sub-port[sub-port-id=1]/admin-state' | grep -e enable -e disable
Now that you have your gnmic calls ready, move to the next task where you will test it while capturing the packets with Edgeshark to observe the impact.
4.7 Validate the gNMIc script#
In this task you will use EdgeShark to observe the traffic on the wire while you toggle MACsec with your script.
Optional: You may disable the links from PE1 and PE2 to P2 to ensure packets flow always through P1.
If you disable the links, you will need to restore them at the end (we've included that step in the activity).
### Redundant links between :material-router: PE1 and :material-router: P1 and between :material-router: PE2 and :material-router: P2
###  "pe1:1/1/c2/1" to  p2:1/1/c1/1"
gnmic -a clab-srexperts-pe1 -u admin -p $EVENT_PASSWORD --insecure set \
--update-path '/configure/port[port-id=1/1/c2/1]/admin-state' --update-value disable
gnmic -a clab-srexperts-p2 -u admin -p $EVENT_PASSWORD --insecure set \
--update-path '/configure/port[port-id=1/1/c1/1]/admin-state' --update-value disable

###  "pe2:1/1/c2/1" to "p2:1/1/c2/1"
gnmic -a clab-srexperts-pe2 -u admin -p $EVENT_PASSWORD --insecure set \
--update-path '/configure/port[port-id=1/1/c2/1]/admin-state' --update-value disable
gnmic -a clab-srexperts-p2 -u admin -p $EVENT_PASSWORD --insecure set \
--update-path '/configure/port[port-id=1/1/c2/1]/admin-state' --update-value disable
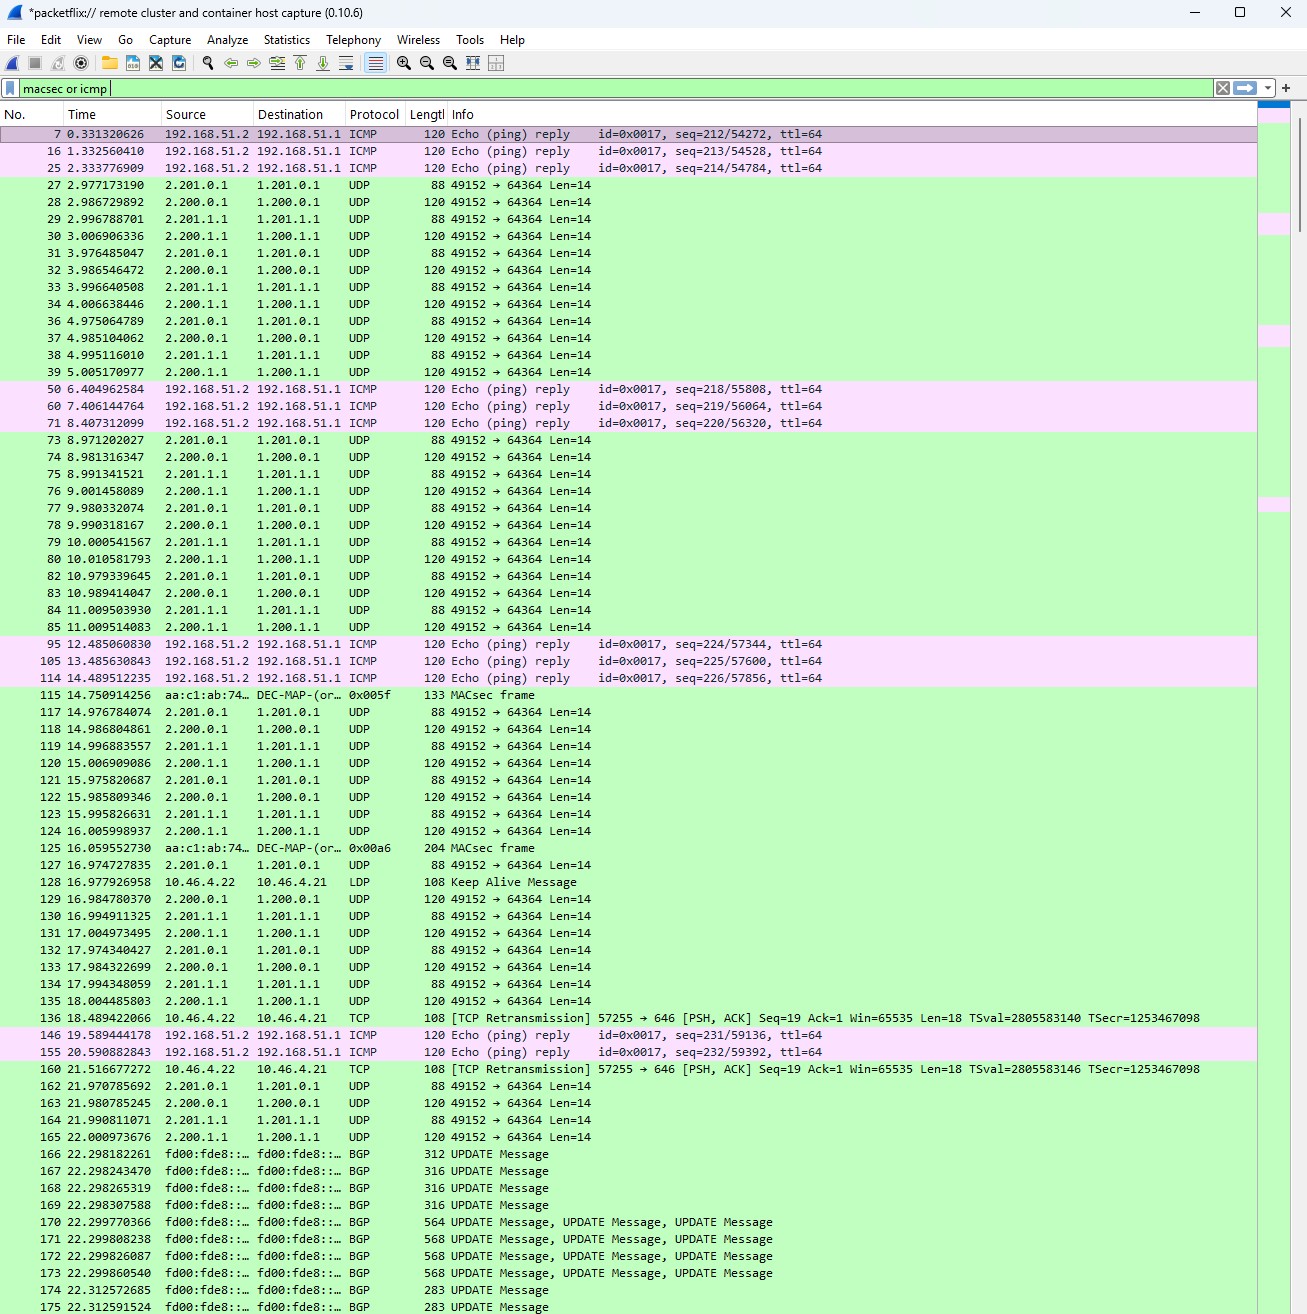
While capturing the packets with Edgeshark, apply the macsec or icmp display filter and run your "toggle" script multiple times.
Question: What packets do you see in the capture when using your gMNIc toggle calls?
You should observe that ICMP is shown either encrypted or in clear text when MACsec is enabled or disabled.
The Fig. 6 below shows the packet capture with multiple toggle script executions.
Warning
Don't forget to re-enable the link again! See Final cleanup tasks below.
4.8 Final cleanup tasks#
You have completed all MACsec tasks but before you go to another one, you should re-enable all the ports and remove MACsec to avoid any impact with other activities.
Execute the following gnmic commands from your hackathon instance.
Enable the backup and redundant links
Enable all the links you disabled in the first task - Disable backup and redundant links.
You will enable these links:
- Backup link between PE1 port
1/1/c8/1and PE2 port1/1/c5/1 - Redundant link between PE1 port
1/1/c2/1and P2 port1/1/c1/1 - Redundant link between PE2 port
1/1/c2/1and P2 port1/1/c2/1
You may execute the following gnmic commands all at once from your hackathon instance.
### Mandatory redundant link between PE1 and PE2
### "pe1:1/1/c8/1" to "pe2:1/1/c5/1"
gnmic -a clab-srexperts-pe1 -u admin -p $EVENT_PASSWORD --insecure set \
--update-path '/configure/port[port-id=1/1/c8/1]/admin-state' --update-value enable
gnmic -a clab-srexperts-pe2 -u admin -p $EVENT_PASSWORD --insecure set \
--update-path '/configure/port[port-id=1/1/c5/1]/admin-state' --update-value enable

### Redundant links between PE1 and P1 and between PE2 and P2
###  "pe1:1/1/c2/1" to  p2:1/1/c1/1"
gnmic -a clab-srexperts-pe1 -u admin -p $EVENT_PASSWORD --insecure set \
--update-path '/configure/port[port-id=1/1/c2/1]/admin-state' --update-value enable
gnmic -a clab-srexperts-p2 -u admin -p $EVENT_PASSWORD --insecure set \
--update-path '/configure/port[port-id=1/1/c1/1]/admin-state' --update-value enable

###  "pe2:1/1/c2/1" to "p2:1/1/c2/1"
gnmic -a clab-srexperts-pe2 -u admin -p $EVENT_PASSWORD --insecure set \
--update-path '/configure/port[port-id=1/1/c2/1]/admin-state' --update-value enable
gnmic -a clab-srexperts-p2 -u admin -p $EVENT_PASSWORD --insecure set \
--update-path '/configure/port[port-id=1/1/c2/1]/admin-state' --update-value enable
Remove MACsec port configurations
You need to remove configs from PE1 to the Provider (P) router's links.
You may recall that you removed the ones from PE2 to the Provider (P) routers before.
Execute the following gnmic commands from your hackathon instance.
## PE1 to P1 and PE1 to P2 ports
gnmic -a clab-srexperts-pe1 -u admin -p $EVENT_PASSWORD --insecure set \
    --delete '/configure/port[port-id=1/1/c1/1]/ethernet/dot1x' \
    --delete '/configure/port[port-id=1/1/c2/1]/ethernet/dot1x'

## P1 to PE1 port
gnmic -a clab-srexperts-p1 -u admin -p $EVENT_PASSWORD --insecure set \
    --delete '/configure/port[port-id=1/1/c1/1]/ethernet/dot1x'

## P2 to PE1 port
gnmic -a clab-srexperts-p2 -u admin -p $EVENT_PASSWORD --insecure set \
    --delete '/configure/port[port-id=1/1/c1/1]/ethernet/dot1x'
5. Summary and Review#
Congratulations! If you have got this far you have completed this activity and achieved the following:
- You have made your network quantum safe (or at least a few links...)!
- You have learned what MACsec brings to the table in a modern networking environment
- You have configured MACsec in model-driven FP5-based SR OS routers
- You have used MACsec for link encryption encrypt
- You have inspected that traffic to confirm that it is indeed being encrypted
- You have automated configuration on model-driven SR OS through gRPC using the gNMI service and the
gnmictool
This is a pretty extensive list of achievements! Well done!
If you're hungry for more have a go at another activity! Perhaps try a topic that is new to you?
If you are interested in Post Quantum Computing (PQC) you could consider an AnySec activity and discover how you can enable per service PQC encryption in your network.
If you would like to explore MACsec automation further you may consider looking at using the gnmic tool for PSK key-rotation.
Perhaps programming/scripting was of interest? If so consider an activity using Python (we can heartily recommend using pySROS ).