Securing gRPC with mTLS#
| Activity name | Securing gRPC with mTLS |
| Activity ID | 18 |
| Short Description | Set up mutual TLS between a gRPC client and server so that both sides are authenticated. |
| Difficulty | Intermediate |
| Tools used | gnmic pyGNMI openssl |
| Topology Nodes | PE1, IXP1 |
| References | TLS on SR Linux TLS on SR OS Openssl documentation |
1. Objective#
One of your goals this year is to prepare your network for a transition to a Zero Trust Architecture. Starting with gRPC and depending on where you look in your environment, gRPC communications may be unsecured or they might already be using Transport Layer Security (TLS). To move toward Zero Trust, you will now implement mutual TLS (mTLS) which requires clients to also prove their identities before accessing your gRPC services.
2. Technology Description#
In this activity you will configure mTLS to secure gRPC in your network. Whether the initial state is secured with TLS or running unencrypted, mTLS improves the security. In this section a few concepts are introduced, and additional reading is proposed. These are not strictly required to continue on with the activity and serve mainly as a reference.
2.1 Certificates#
X.509 Certificates (sometimes also referred to as TLS, SSL or digital certificates) are sets of credentials that can be used to confirm identities and are fundamental to setting up encrypted, secure connections between clients and servers. They are built on a hierarchical chain-of-trust structure whereby the top-level self-signed certificate is identified as one of the root Certificate Authorities (CA). These Root CA are directly or indirectly responsible for signing any certificates further in the tree.
Specific to this activity, you will find that IP and DNS information must be part of the certificates in some cases. More reading on attributes that can be a part of certificates is available here.
2.2 Transport Level Security#
The main technology that makes use of certificates is Transport Layer Security (TLS). In the regular TLS situation, the only part providing a certificate is the server. The client is then able to verify that the server is providing a TLS certificate signed by a CA that it trusts before proceeding with the connection.
Common examples of this type of interaction being secured with TLS include web-traffic via HTTPS, e-mail and gRPC as you will see in this activity.
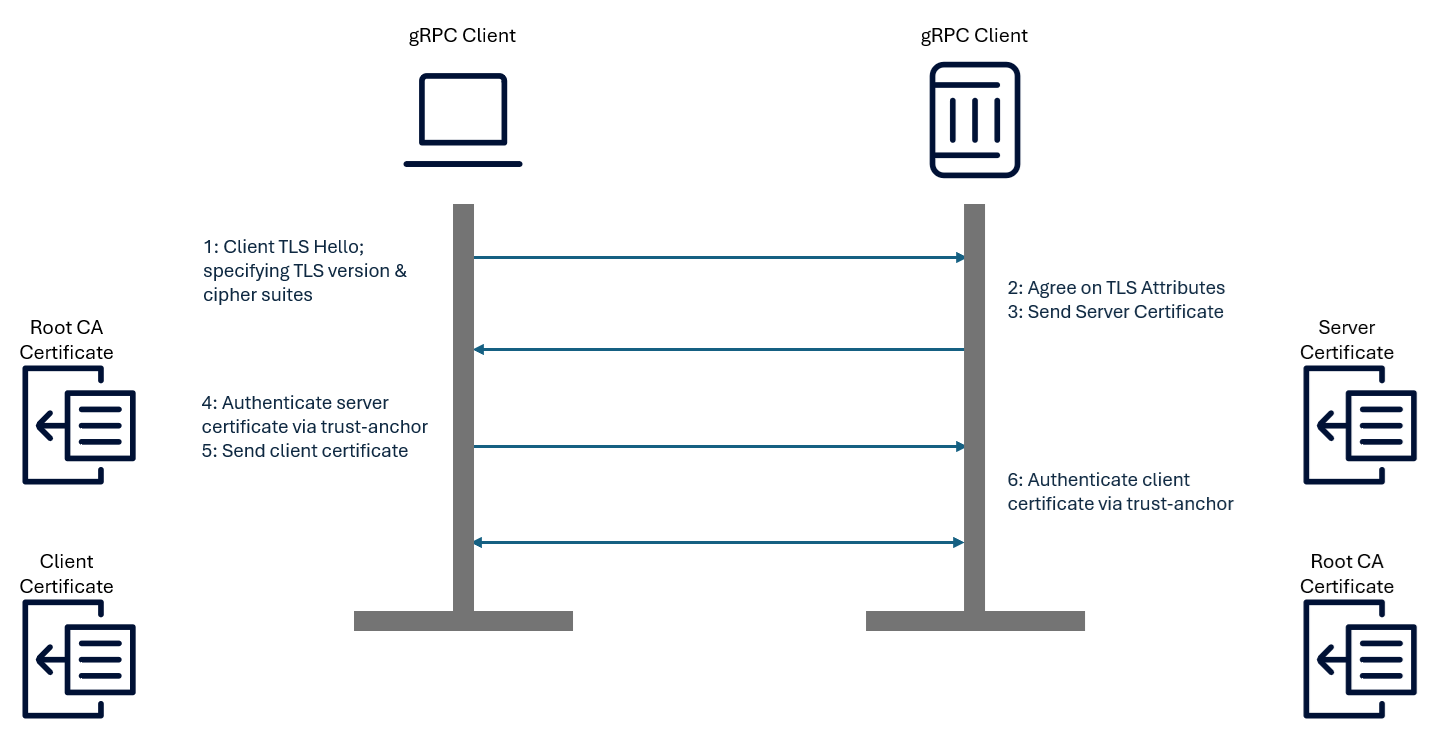
Taking it one step further, mutual TLS provides mutual authentication where standard TLS provides only one-way authentication. This is achieved by requiring the client to provide a certificate as well. The image below illustrates gRPC Client and Server communication with mTLS.
3. Tasks#
You should read these tasks from top-to-bottom before beginning the activity.
It is tempting to skip ahead but tasks may require you to have completed previous tasks before tackling them.
In this activity you will:
- Verify if gRPC is enabled and whether or not it is secured with TLS.
- Create a CA and generate certificates for your client machine and any target devices in the network.
- Add the generated files and configuration to your network elements and confirm that mTLS is enabled.
- Write a Python script that reports if a device is enabled with mTLS or not.
- Roll out mTLS to additional devices and use your script to confirm you were successful.
3.1 Confirming the initial status#
Your group's hackathon instance comes with several gRPC clients preinstalled. In this activity you will focus on the gNMI service and its corresponding client: gnmic. The network elements are set up to listen for gRPC on port 57400. Log in to the instance using an SSH client and the credentials provided to you and use gnmic to confirm that PE1 has gRPC enabled. If enabled, verify if the communication with the gRPC server is encrypted using TLS.
Look to the gnmic documentation for pointers on how you might be able to achieve this.
Relevant gnmic flags.
For evaluating the gRPC server's security look to the --skip-verify and --insecure flags.
Is the gRPC server on PE1 running with TLS enabled?
No, it is not. One way you could have noticed this is by confirming that gnmic can only execute RPCs successfully when the --insecure flag is specified as the server would have to be running insecure gRPC for this to work. Alternatively, if the gnmic calls succeed with the --skip-verify flag, that would mean the server was enabled with TLS and not looking for client authentication.
With the --insecure flag the gnmic call succeeds.
~$ gnmic -a clab-srexperts-pe1 capabilities --insecure -u admin -p $EVENT_PASSWORD
gNMI version: 0.8.0
supported models:
  - nokia-conf, Nokia, 26.3.R1
  - nokia-state, Nokia, 26.3.R1
  - nokia-bof-conf, Nokia, 26.3.R1
  - nokia-bof-state, Nokia, 26.3.R1
  - nokia-debug-conf, Nokia, 26.3.R1
  - nokia-debug-state, Nokia, 26.3.R1
  - nokia-li-conf, Nokia, 26.3.R1
  - nokia-li-state, Nokia, 26.3.R1
supported encodings:
  - JSON
  - BYTES
  - PROTO
  - JSON_IETF
With the --skip-verify flag the gnmic call fails.
~$ gnmic -a clab-srexperts-pe1 capabilities --skip-verify -u admin -p $EVENT_PASSWORD
target "clab-srexperts-pe1", capabilities request failed: "clab-srexperts-pe1:57400" CapabilitiesRequest failed: rpc error: code = Unavailable desc = connection error: desc = "transport: authentication handshake failed: tls: first record does not look like a TLS handshake"
Error: one or more requests failed
Note that in SR OS only a single gRPC server can be enabled, and it can be set up with or without encryption. There is no way to have both in parallel simultaneously. This is different for SR Linux as you will see later, where various gRPC server configurations can coexist as long as they are using different listening ports.
Packet capture options
A packet capture is very useful to troubleshoot or to validate that the configurations are working as expected. In this activity it may be used to observe if the gnmic calls are in cleartext or TLS encrypted. It is also useful to capture the (m)TLS messages exchanged.
You have several packet capture options:
- The recommended one is to use EdgeShark WEB UI directly with the URL:
http://${INSTANCE_ID}.srexperts.net:5001 - You may also use EdgeShark from your VSCode with the ContainerLab plugin, by selecting a node interface in the ContainerLab explorer menu
- Other options are TCPDump or TShark
For more details about the Containerlab packet capture options refer to the tools guide Containerlab Capture traffic .
Warning
Currently SR-SIM packet captures only display ingress packets. You may capture PE1 interface eth0, you will only see ingress packets but that should be enough for this activity. Moreover, because the nodes are configured with streaming telemetry, the egress will display a lot of messages that you would need to filter.
Capture both directions
You don't need to, but if you want to see both directions, and since you are sending gnmic calls from your hackathon instance, you could capture traffic on the docker bridge used for the topology network and apply the 'http2.headers.path contains "Capabilities"' filter. The easiest way is to use EdgeShark WEB UI and follow the PE1 interface eth0 link to the bridge interface you want to capture.
You may also find the bridge ID with the docker network ls command.
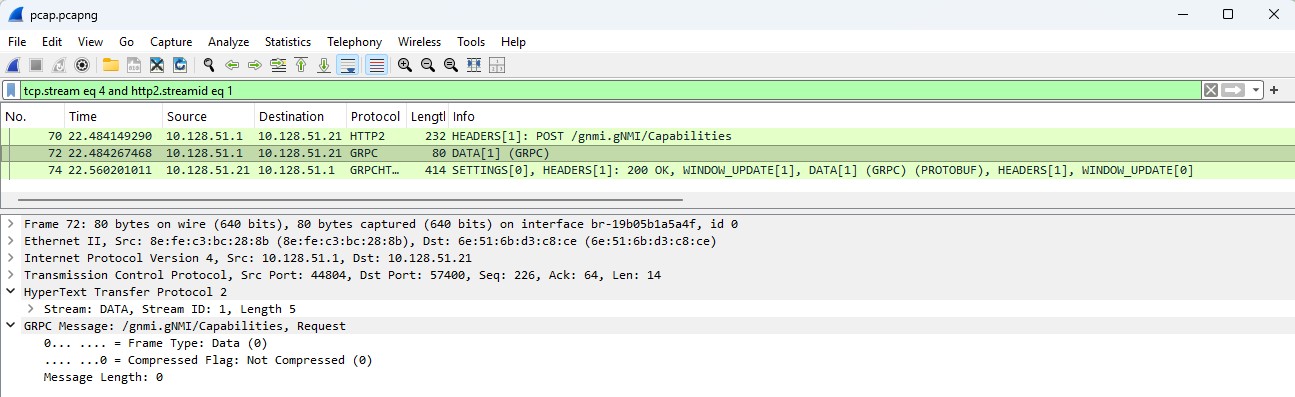
br- prefixed to the Network ID. Once you apply the 'http2.headers.path contains "Capabilities"' filter you may right click the message, select follow and then HTTP/2 stream. You'll get the message exchange as shown below:
For (m)TLS you could follow a similar approach, although the traffic will not be in cleartext as it is here.
3.2 Create a self-signed CA and generate certificates#
In this task you will generate your own Certificate Authority (CA) and start generating, signing and distributing certificates. One commonly used tool for this is the Linux command line utility openssl.
Warning
As this is a transient lab environment self-signed certificates aren't dangerous to use. It is not recommended to download and re-use the CA for production environments.
Go back to the SSH session on your group's hackathon instance or create a new one and create a folder where you can store files related to this activity.
3.2.1 Creating a self-signed Certificate Authority#
Any certificate generation essentially involves generating a Certificate Signing Request (CSR), a private key to go with your certificate and the signing of the certificate by a CA. For this activity, the CA you use will be self-signed: the key represented by the CA certificate is the same key used to sign the certificate. You will go on to use this CA to sign other certificates that are not self-signed. The self-signed CA will be used as a trusted authority while certificates signed by that CA will be used by your gRPC client and servers.
Many online resources are available about generating certificates using openssl. Try to come up with a solution and feel free to verify it with any of us if you aren't sure if it would work. You may also look further down in this section for a possible approach.
Before proceeding, ensure your generated CA certificate file shows that is indeed suitable for use as a CA, using openssl. You can check this on your group's hackathon instance as follows:
If verification is successful, meaning your CA is ready to be used and ca.pem was signed by ca.pem, the output would be:
~/mtls-activity$ openssl x509 -in ca.pem -text -noout; openssl verify -CAfile ca.pem ca.pem
Certificate:
    Data:
        Version: 3 (0x2)
        Serial Number:
            4d:6c:f3:6a:a5:3d:1b:90:24:3d:81:83:30:70:d2:8e:8e:c7:9a:17
        Signature Algorithm: sha256WithRSAEncryption
        Issuer: C = AU, ST = Some-State, O = Internet Widgits Pty Ltd
        Validity
            Not Before: May 14 21:54:30 2026 GMT
            Not After : Jun 13 21:54:30 2026 GMT
        Subject: C = AU, ST = Some-State, O = Internet Widgits Pty Ltd
        Subject Public Key Info:
            Public Key Algorithm: rsaEncryption
                Public-Key: (2048 bit)
                Modulus:
                    00:b4:89:11:4e:e0:0a:38:fe:25:80:79:37:d5:61:
                    cc:34:20:4d:b8:79:60:58:17:5c:55:df:c5:1b:d0:
                    f3:c3:d7:a8:60:76:2a:35:cf:7a:39:94:04:c5:ef:
                    6e:bd:9d:79:7c:a7:6f:64:d6:7e:13:b8:ea:e0:0e:
                    89:4c:ec:f4:f1:b8:60:dd:37:32:06:ba:10:93:49:
                    11:b6:70:6e:65:b1:7e:5d:98:b4:bd:9b:8b:98:2b:
                    a1:e9:5a:4c:d5:97:61:3f:b7:66:74:67:9e:3d:d0:
                    0c:64:40:cc:35:6b:97:07:d3:fc:61:c5:d5:41:d3:
                    81:db:d0:15:ce:99:64:43:0a:54:38:5d:6f:59:81:
                    98:fa:d0:90:0e:74:85:82:7f:42:3c:11:9d:4a:bc:
                    b9:cf:55:7a:84:87:46:4f:cd:a4:d2:2d:31:1d:92:
                    0a:75:96:6b:be:b8:63:72:d0:b9:50:e5:85:09:e8:
                    13:fa:59:24:0c:75:65:ff:66:a6:4f:b3:27:07:8b:
                    b3:50:20:76:03:30:62:ee:09:93:5f:71:85:81:b0:
                    47:3b:b8:aa:c1:45:90:f3:7a:4e:78:f8:7b:08:1f:
                    c8:92:ed:f9:57:0b:b8:37:e8:e9:a4:88:8f:26:ce:
                    17:fb:7b:fd:dd:94:02:ab:de:87:58:76:3f:87:68:
                    d5:89
                Exponent: 65537 (0x10001)
        X509v3 extensions:
            X509v3 Subject Key Identifier:
                5F:21:BC:66:B4:C2:97:DE:68:18:7D:93:D0:52:77:4D:BD:5A:8F:F8
            X509v3 Authority Key Identifier:
                5F:21:BC:66:B4:C2:97:DE:68:18:7D:93:D0:52:77:4D:BD:5A:8F:F8
            X509v3 Basic Constraints: critical
                CA:TRUE
    Signature Algorithm: sha256WithRSAEncryption
    Signature Value:
        15:b8:d0:b8:e6:e5:b3:10:1d:9d:61:22:38:b6:c1:91:da:d8:
        cf:81:41:8f:b1:44:22:28:5b:78:e1:97:d2:eb:b0:d7:82:3f:
        7c:2f:2d:52:5c:e4:61:d3:4c:c0:a8:a4:fc:f7:6e:82:56:24:
        6d:87:00:c2:af:17:81:2d:38:67:ec:00:77:e2:f7:76:cf:ad:
        d0:c5:bd:31:b4:1e:98:df:07:24:88:35:c8:bc:5d:6b:9b:fd:
        35:31:7a:0b:56:8c:65:37:69:a1:ff:09:2c:12:b8:8c:47:af:
        97:da:eb:38:f8:fc:cf:f6:93:90:a2:3e:6e:bb:2e:c5:ed:1b:
        d9:6f:1b:d6:8d:95:21:7a:b3:c8:ab:0b:a1:3a:b9:07:65:17:
        e6:42:aa:08:9c:16:23:15:ec:6a:8e:af:e7:45:22:3e:30:e9:
        f9:af:03:79:67:22:20:5d:9b:80:a8:4d:bc:a0:98:88:6e:b1:
        19:7b:49:43:18:86:ec:61:16:f9:a4:bd:e0:a8:52:dc:43:d9:
        89:6e:ea:2c:1d:50:51:7b:51:76:87:a0:0b:32:1f:bc:e7:cc:
        1d:50:a2:3f:6d:ac:85:09:cf:3a:b3:d7:5f:e8:bb:e2:b7:0f:
        0e:c9:c4:74:50:67:9b:50:7d:30:22:43:d7:f3:fb:af:5c:78:
        00:ca:2e:c3
ca.pem: OK
3.2.2 Generating a client and server certificate#
Next up you'll have to generate Certificate Signing Requests (CSR) for the gRPC client and server that are signed by the CA generated in the previous step. Ensure that both the client and server certificates include the relevant IP and DNS information as a Subject Alternative Name (SAN) to ensure they will be considered valid. A certificate that doesn't contain that information will be considered invalid and unusable.
For your client, add only the IP addresses it will use to reach your nodes in the containerlab network. This IP address includes your instance identifier and will be of the form 10.128.${INSTANCE_ID}.1.
For your server, as you will start with PE1, add the hostname and BOF IP Address. These values should look like g${INSTANCE_ID}_pe1 and 10.128.${INSTANCE_ID}.21 respectively.
Before proceeding, ensure both of your generated certificates can be verified against your CA using the openssl command from the previous section:
Adding SANs to a certificate.
Subject Alternative Name (SAN) is an extension to the SSL/TLS certificate standard (X.509) that allows you to specify additional hostnames, IP addresses, and email addresses that are securely protected by a single certificate. To end up with a valid certificate you'll have to add the information when signing it, at least. You can add SANs either via configuration files or via CLI parameters. In more industrial-grade solutions you can expect that SAN information must be in the CSR as well.
Verification
Use the commands below and make sure your output matches the expected output. If it doesn't, recheck your steps as this means your CA was not the signing authority for your client or server certificate.
OpenSSL steps
When creating the certificates, you will be requested to provide information. You may leave all default values, just press enter to all seven questions.
Generate a self-signed CA
For PE1, create a server certificate signing request. Note that the INSTANCE_ID environment variable in your hackathon instance has been set equal to your group ID.
openssl req -new -newkey rsa:2048 -keyout server.key -out server.csr -nodes -addext "subjectAltName=DNS:pe1,DNS:clab-srexperts-pe1,IP:10.128.${INSTANCE_ID}.21"
For your group's hackathon instance, create a client certificate. As before, we use the INSTANCE_ID environment variable.
openssl req -new -newkey rsa:2048 -keyout client.key -out client.csr -nodes -addext "subjectAltName=DNS:${INSTANCE_ID},IP:10.128.${INSTANCE_ID}.1"
3.3 Switch from unsecure to secure gRPC#
In this task, you will reconfigure a router so it uses TLS for gRPC if it was not already doing so. If it already was set up for TLS, you can skip the remainder of this section if you can ascertain that the certificate used for the server is signed by a certificate authority whose public certificate you can specify as the CAfile to your gRPC client later on. If that is not possible, continue this task to configure TLS in a way that you can control.
3.3.1 Copy the necessary files to the router#
To be able to use the server certificate you generated for a gRPC server on PE1, the certificate and its corresponding private key must be uploaded. Use scp or your method of choice to upload the router's intended certificate and private key.
3.3.2 Import the files on the router#
SR OS relies on an import command to ensure certificates and any potential associated key files are stored correctly. These files will be available in the cf3:/system-pki folder. Look through the documentation for a way to import the files you just uploaded.
3.3.3 Configure TLS on the router#
To configure TLS in SR OS for PE1 you'll need to create several objects. As you are in model-driven mode they can be created in any order provided you apply the changes in a single transaction.
Create the following:
- A
cert-profilereferencing the certificates you uploaded and imported into the device previously. - The
server-cipher-listto include a list of valid ciphers for the server to present. You can choose which version to use, however note that for TLS 1.3 you will require additional configuration from those listed here. - A
server-tls-profilepointing to the two objects above.
Make sure everything is administratively enabled!
Verify that the TLS profiles are operationally up by looking at the state in the system before proceeding.
Solution
3.3.4 Switch from unsecure to secure gRPC#
Update the configuration of PE1 so that it no longer allows unsecure connections to its gRPC server and instead uses the TLS configuration you created and validated.
3.3.5 Confirm your changes have the intended effect#
Use the gnmic commands you used previously to check that the gRPC server on PE1 is now using TLS.
With the --insecure flag the gnmic call now fails.
~$ gnmic -a clab-srexperts-pe1 capabilities --insecure -u admin -p $EVENT_PASSWORD
target "clab-srexperts-pe1", capabilities request failed: "clab-srexperts-pe1:57400" CapabilitiesRequest failed: rpc error: code = Unavailable desc = connection error: desc = "error reading server preface: EOF"
Error: one or more requests failed
With the TLS certificate the gnmic call now succeeds.
~$ gnmic -a clab-srexperts-pe1 capabilities --tls-ca ca.pem -u admin -p $EVENT_PASSWORD
gNMI version: 0.8.0
supported models:
  - nokia-conf, Nokia, 26.3.R1
  - nokia-state, Nokia, 26.3.R1
  - nokia-bof-conf, Nokia, 26.3.R1
  - nokia-bof-state, Nokia, 26.3.R1
  - nokia-debug-conf, Nokia, 26.3.R1
  - nokia-debug-state, Nokia, 26.3.R1
  - nokia-li-conf, Nokia, 26.3.R1
  - nokia-li-state, Nokia, 26.3.R1
supported encodings:
  - JSON
  - BYTES
  - PROTO
  - JSON_IETF
Confirming that, and with the client certificate already waiting, you should be ready to continue on into the next section and set up mTLS.
Solution
/configure system security tls cert-profile "grpc_cert_profile" admin-state enable
/configure system security tls cert-profile "grpc_cert_profile" entry 1 certificate-file "server.pem"
/configure system security tls cert-profile "grpc_cert_profile" entry 1 key-file "server.key"
/configure system security tls server-cipher-list "grpc_cipher_list" tls12-cipher 1 name tls-ecdhe-rsa-aes256-gcm-sha384
/configure system security tls server-cipher-list "grpc_cipher_list" tls12-cipher 2 name tls-ecdhe-rsa-aes128-gcm-sha256
/configure system security tls server-tls-profile "grpc_tls_profile" cert-profile "grpc_cert_profile"
/configure system security tls server-tls-profile "grpc_tls_profile" cipher-list "grpc_cipher_list"
/configure system security tls server-tls-profile "grpc_tls_profile" admin-state enable
# Configure secure gRPC on PE1
/configure system grpc tls-server-profile "grpc_tls_profile"
3.4 Upgrade from TLS to mTLS#
Throughout the previous tasks you have secured gRPC for the PE1 node. Conceptually that means that a client using the gRPC server receives confirmation from your CA that it is indeed interacting with PE1. The traffic is also encrypted and can no longer be intercepted by anyone listening on the wire. You may execute a new packet capture, as you did before, to see this in action (refer to the tools guide Containerlab Capture traffic for the packet capture options).
In turn, PE1 is now providing gRPC services to any client bold enough to attempt it, provided they attempt to set up a secured connection. This does not fit into your Zero Trust approach. You will address this in this section, as you will make sure that any client must prove its own identity.
This involves similar steps as you have done in the previous section. If the server is to verify certificates provided by its clients it must also have a CA to refer to. To that end, to set up mTLS, you will have to upload and import your CA's public certificate as you have done previously with the server's certificate. Note that the CA key is not needed by the router and should remain secret.
After that you will have to configure a trust-anchor-profile and use it to authenticate clients in your server-tls-profile. You may be able to use what you did previously here, and the System Management Guide may also provide guidance.
Certificate Revocation Lists (CRL)
By default, SR OS considers end-entity (EE) certificates whose revocation status cannot be determined (for example, due to a missing, expired, or corrupt CRL) as revoked. You may encounter this problem in this section of the activity. You can either create and add a valid CRL to the CA profile configuration, or reconfigure the default behavior so that certificates with an undetermined revocation status are treated as good (not revoked) using the command below.
/configure system security tls server-tls-profile "grpc_tls_profile" status-verify default-result good
default-result good overrides the EE certificate revocation check for the TLS server profile, meaning the router will return a "good" revocation status for EE certificates even when their actual status cannot be verified. This should only be used when there is a legitimate reason to bypass the revocation check (for example, during a temporary network issue affecting CRL retrieval). Once you're done, look in the router's state to confirm everything is operationally up and then try the gnmic commands you used before. You should find a need to specify the client certificates you generated previously. Before continuing, make sure the only way to get a response to your gnmic commands from PE1 is when you specify a --tls-ca (to trust the server), --tls-key and --tls-key (to satisfy the server).
Validation
$ gnmic -a clab-srexperts-pe1 capabilities -u admin -p $EVENT_PASSWORD --tls-ca ca.pem --tls-cert client.pem --tls-key client.key
gNMI version: 0.8.0
supported models:
  - nokia-conf, Nokia, 26.3.R1
  - nokia-state, Nokia, 26.3.R1
  - nokia-bof-conf, Nokia, 26.3.R1
  - nokia-bof-state, Nokia, 26.3.R1
  - nokia-debug-conf, Nokia, 26.3.R1
  - nokia-debug-state, Nokia, 26.3.R1
  - nokia-li-conf, Nokia, 26.3.R1
  - nokia-li-state, Nokia, 26.3.R1
supported encodings:
  - JSON
  - BYTES
  - PROTO
  - JSON_IETF
Solution
Certificate Revocation Lists
The CRL configuration to mark certificates with no corresponding CRL as not revoked by default is not included as part of the solution. In case you experience issues and aren't intending to supply your own CRL, make sure you have made that change to your configuration as described above.
3.5 Automated validation of mTLS#
Knowing you'll have to assess the readiness of your entire network for an evolution towards Zero Trust, in this task you automate the verification of mTLS configuration in your network. Automating this test early on means you can reliably continue converting other nodes in the network.
In this task you will do just that. Python is an option for this, as the pygnmi library has the necessary functionality for this and it comes preinstalled on your group's hackathon instance.
Create a Python script that tries to connect to each of your network elements and reports back if they are running gRPC unsecure, using TLS or using mTLS. For inspiration the pygnmi examples may be useful.
Programming with gnmic
A similar solution could be made using the Go programming language with the gnmic bindings for Go.
Example Solution
The example script given below can be run on your group's hackathon instance. The script attempts to connect to the specified target node(s) using the parameters provided and, if successful, concludes that that is the gRPC security level configured. If no methods succeed the conclusion is that there is no gRPC server listening on port 57400 on the target device.
This script is available at ~/SReXperts/activities/activity-18/main.py.
import os
from pygnmi.client import gNMIclient
# avoid error messages in stdout as per https://github.com/akarneliuk/pygnmi/issues/120
import logging
from pygnmi.client import logger as gnmi_logger
gnmi_logger.setLevel(logging.CRITICAL + 1)

def main():
    """Main entrypoint function"""
    report = {}
    password=os.getenv("EVENT_PASSWORD")
    if password is None:
        raise ValueError("No Event password defined! Env variable not set.")

    for node in ["clab-srexperts-pe1", "clab-srexperts-ixp1"]: #optionally include additional nodes
        result = "no grpc"
        try:
            with gNMIclient(    target=(node,57400),
                                username="admin",
                                password=password,
                                insecure=True) as gc:
                _ = gc.capabilities()
                result = "unsecure"
        except Exception as e:
            pass
        if (result == "no grpc"):
            try:
                with gNMIclient(    target=(node,57400),
                                    username="admin",
                                    password=password,
                                    path_root="ca.pem") as gc:
                    _ = gc.capabilities()
                    result = "tls"
            except Exception as e:
                pass

        if (result == "no grpc"):
            try:
                with gNMIclient(    target=(node,57400),
                                    username="admin",
                                    password=password,
                                    path_root="ca.pem",
                                    path_cert="client.pem",
                                    path_key="client.key") as gc:
                    _ = gc.capabilities()
                    result = "mtls"
            except Exception as e:
                pass

        report[node] = result


    for node,result in report.items():
        print(f"{node:<20}: {result}")

if __name__ == "__main__":
    main()
3.6 Roll out mTLS on another device#
As you can now easily see the state of the gRPC servers in your network, continue with setting up mTLS on IXP1 to keep the positive transition going. You could use your Python script, gnmic or any other method familiar to you to verify your progress. Refer to the SRL documentation for some initial pointers. The logic remains the same:
- generate certificates using your existing CA
- Upload & configure TLS on the target device
- Specify the trusted CA and enable mTLS
Troubleshooting gRPC
In SR Linux you may find that the operational state of the gRPC server you are changing to be mTLS secured remains operationally down. You may be able to find useful information by dropping down into a bash shell and looking at the tail of the log file /var/log/srlinux/debug/sr_grpc_server.log.
Solution
For IXP1, create a server certificate signing request. Once again the INSTANCE_ID environment variable is used, you may instead use your group ID directly.
On IXP1, with contents of the files generated replacing the placeholder values, set via SSH
insert / system tls profile grpc_cert_profile key "<contents of ixp1.key>"
insert / system tls profile grpc_cert_profile certificate "<contents of ixp1.pem>"
insert / system tls profile grpc_cert_profile authenticate-client true
insert / system tls profile grpc_cert_profile trust-anchor "<contents of ca.pem>"
insert / system grpc-server insecure-mgmt tls-profile grpc_cert_profile
3.7 Final cleanup task#
You have completed all the tasks but before you go to another one you must restore the gRPC configuration back to how you found it on IXP1 and PE1, so as not to impact any other activities.
Configure grpc to allow-unsecure-connection at IXP1 and PE1
You may use SSH or gnmic for this task. Below you'll find both options, select one to continue.
If you used the CLI to revert the configurations you don't need to execute this option. It is shown here to demonstrate that when you applied the configuration, the routers closed the mTLS gnmic calls. Further gnmiccalls need to switch to insecure.
gnmic -a clab-srexperts-pe1 -u admin -p $EVENT_PASSWORD --tls-ca ca.pem --tls-cert client.pem --tls-key client.key set \
  --update-path '/configure/system/grpc' \
  --update-value '{"allow-unsecure-connection":[null]}'
gnmic -a clab-srexperts-ixp1 -u admin -p $EVENT_PASSWORD --tls-ca ca.pem --tls-cert client.pem --tls-key client.key set \
  --delete '/system/grpc-server[name=insecure-mgmt]/tls-profile'
What the output may look like (note the descriptive errors!):
bash$ gnmic -a clab-srexperts-pe1 -u admin -p $EVENT_PASSWORD --tls-ca ca.pem --tls-cert client.pem --tls-key client.key set \
  --update-path '/configure/system/grpc' \
  --update-value '{"allow-unsecure-connection":[null]}'
target "clab-srexperts-pe1" set request failed: target "clab-srexperts-pe1" SetRequest failed: rpc error: code = Canceled desc = INFO: MGMT_CORE #2003: Session terminated - server shutdown
Error: one or more requests failed
bash$ :~/mtls-activity$ gnmic -a clab-srexperts-ixp1 -u admin -p $EVENT_PASSWORD --tls-ca ca.pem --tls-cert client.pem --tls-key client.key set \
  --delete '/system/grpc-server[name=insecure-mgmt]/tls-profile'
target "clab-srexperts-ixp1" set request failed: target "clab-srexperts-ixp1" SetRequest failed: rpc error: code = Unavailable desc = Cancelling all calls
Error: one or more requests failed
Validate the configuration and confirm that gnmic insecure is working, using either gnmic or your Python script.
4. Summary#
Congratulations! If you have got this far you have managed to upgrade the security in part of your network to mTLS. This takes you one step closer to a Zero Trust implementation in your network.
In this exercise you have:
- Created a self-signed Certificate Authority
- Signed and distributed certificates to one or more of your network elements, and your client device
- Configured and tested mTLS on your gRPC server and clients both manually and in an automated way
Well done!
If you're hungry for more have a go at another activity! Perhaps try a topic that is new to you?