Introduction to the SR Linux YANG CLI#
| Activity name | Introduction to the SR Linux YANG CLI |
| Activity ID | 28 |
| Short Description | Learn to efficiently navigate and operate the Nokia SR Linux Model-Driven CLI (MD-CLI) by understanding its prompt and modes, exploring configuration and state hierarchies, managing changes with commit/rollback workflows, using output modifiers, creating aliases, and leveraging command history. |
| Difficulty | Beginner |
| Tools used | SR Linux CLI |
| Topology Nodes | leaf21, leaf22, leaf23, spine21, spine22 |
| References | CLI User Guide Getting Started with SR Linux CLI |
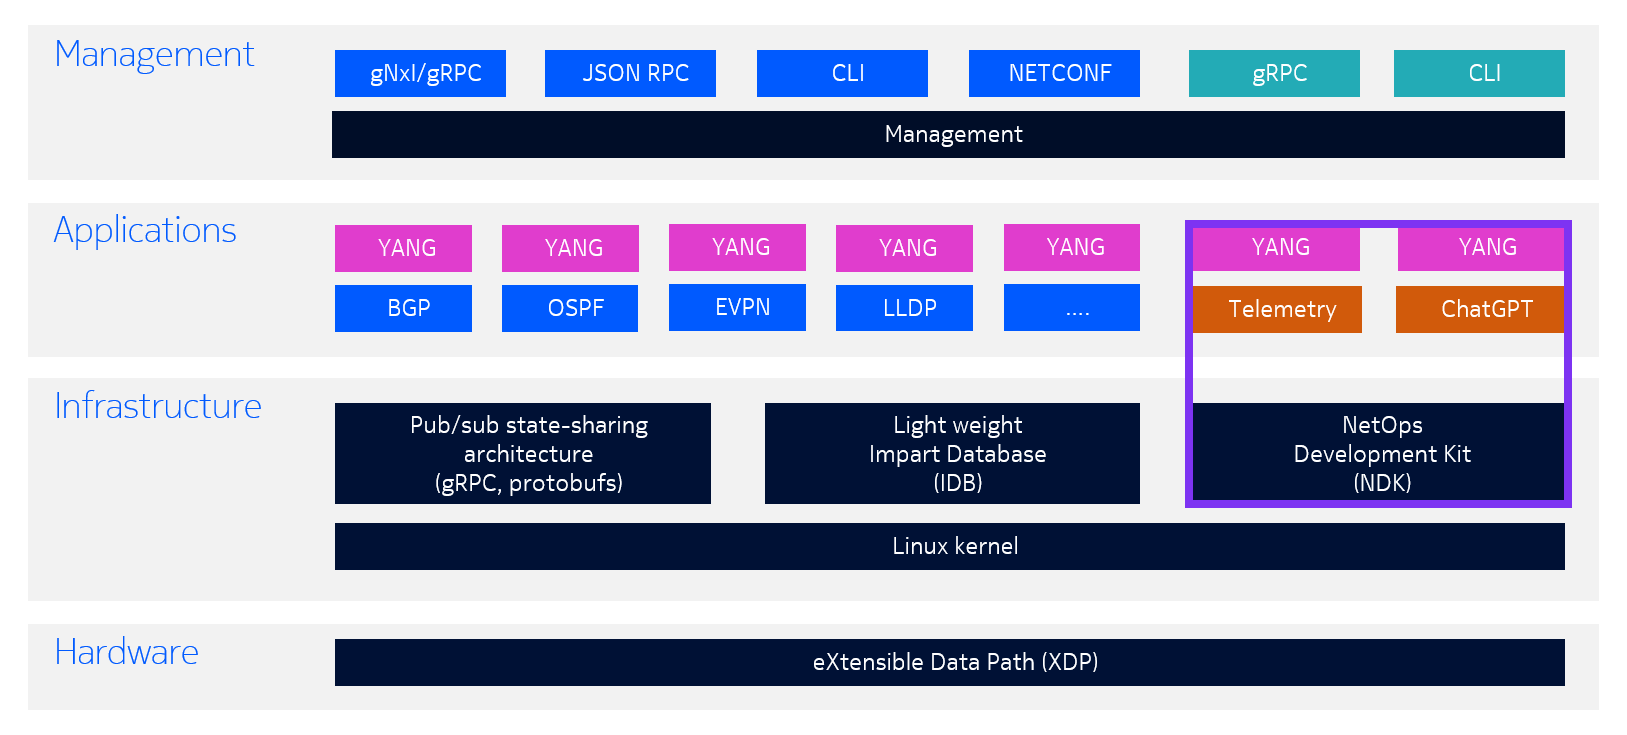
Nokia SR Linux is a modern, fully model-driven Network Operating System (NOS). Unlike traditional NOS platforms, SR Linux is built from the ground up on a 100% YANG-modelled infrastructure, meaning that every configuration element, state value, and operational action is defined by a YANG model. This ensures consistency across the CLI, NETCONF, and gRPC management interfaces.
This activity is designed as a starter guide for those operators who have never used SR Linux before. If you are familiar with SR Linux we suggest you tackle one of the other activities at the level you feel is appropriate.
In this activity, you will explore the SR Linux CLI over four progressive tasks, navigating the interface, applying real configurations, customizing your environment with aliases, and managing configuration safety through checkpoints and rollback. By the end, you will have a solid foundation for operating Nokia SR Linux nodes using the model-driven approach.
1. Objective#
By completing this hackathon activity, you will gain practical, hands-on experience with the Nokia SR Linux CLI, a modern, YANG-based management interface that provides a consistent and structured approach to router configuration and operations. You will learn how to navigate the CLI hierarchy, apply and commit configurations using the transactional candidate datastore model, use output modifiers and wildcards for efficient operations, and safeguard network changes using rollback. The activity equips you with the foundational skills needed to confidently manage Nokia SR Linux nodes using the CLI in a model-driven operational environment.
2. Technology Explanation#
2.1 SR Linux Architecture#
The SR Linux CLI is a modern, powerful, and highly customizable text-based interface. It was designed to evolve the CLI paradigm, bringing features common in modern shells (such as context-aware autocompletion, structured output, and inline suggestions) to network operations.
If you're already an experienced SR OS operator you will find SR Linux familiar and highly extensible. If you're not an SR OS user, you will also find SR Linux very familiar as it shares many of the characteristics of Linux.
Key benefits of the SR Linux CLI include:
-
Transactional configuration: Changes are made in a candidate datastore and only become active after a
commitcommand is issued. Adiffcommand allows you to review staged changes before applying them. More information can be found here. -
Multiple CLI modes:
running,candidate,showandstatemodes allow operators to view configuration, make changes, and inspect state information, including counters and derived values, from a single consistent interface. -
Structured data output: Configuration and state can be displayed in JSON or YAML formats using the
| as jsonand| as yamloutput modifiers, making it easy to integrate with automation tools. More information can be found here. -
Wildcards and ranges: Operators can apply configuration or retrieve state across multiple list elements simultaneously using
*wildcards and{x..y}range syntax, enabling bulk configuration changes with a single command. More information can be found here. -
Automation-ready: The SR Linux CLI shares the same YANG models used by the external API interfaces such as NETCONF, JSON-RPC and gRPC, enabling seamless integration with model-driven automation workflows.
The running, candidate, show and state modes are entered using the enter global command and provide a clean separation between viewing active configuration, staging changes, executing show commands to display information and inspecting operational state.
3. Tasks#
You should read these tasks from top-to-bottom before beginning the activity.
It is tempting to skip ahead but tasks may require you to have completed previous tasks before tackling them.
3.1 Orientation, Navigating the SR Linux CLI#
3.1.1 Key Concepts#
3.1.1.1 The Two-Line Prompt#
By default, the SR Linux CLI features a two-line prompt:
- Line 1: Shows the current CLI mode (
running,candidate,show,state) and the current context in[ ]. - Line 2: Shows the CPM you are connected to, the username and the hostname (e.g.,
A:admin@g1-leaf21#).
The * prefix on the mode indicator means there are uncommitted changes in the candidate datastore.
CLI Modes
| Mode | Description |
|---|---|
running | View active configuration; execute operational commands; no config changes allowed |
candidate | Stage configuration changes in the candidate datastore |
show | Execute show CLI plugins to display information about configured features and operational states |
state | View configuration and state values (counters, oper-state, statistics, etc.) |
-
Log in and observe the prompt. Identify the CLI mode, current context, username, and hostname.
Observe the prompt
--{ + running }--[ ]-- A:admin@g1-leaf21# show version ------------------------------------------------------------------------- Hostname : g1-leaf21 Chassis Type : 7220 IXR-D3L Part Number : Sim Part No. Serial Number : Sim Serial No. System HW MAC Address: 1A:0C:13:FF:00:00 OS : SR Linux Software Version : v26.3.1 Build Number : 410-g98ed16c774c Architecture : x86_64 Last Booted : 2026-04-21T10:03:54.921Z Total Memory : 65842952 kB Free Memory : 8873776 kB ------------------------------------------------------------------------- -
Enter candidate configuration mode:
enter candidate -
Navigate to the BGP context:
network-instance default protocols bgp -
Use the
treecommand to explore the command tree under the current context.Tool
To easily navigate the full YANG model, you can use the SR Linux YANG browser
-
Use
exit,exit all,exit to,backand/to navigate between levels. -
Use
pwcto display the present working context. -
Use the
infocommand to inspect the datastore content. -
Enter
statemode to inspect operational state values alongside configuration.Enter state mode
3.1.2 Key Navigation Commands#
| Action | SR Linux CLI |
|---|---|
| Move back one level | exit |
| Exit to a specific parent | exit to <context> |
| Move to root context | / |
| Show command tree | tree |
| Show present working context | pwc |
| Enter candidate mode | enter candidate |
| Enter show mode | enter show |
| Enter running mode | enter runnning |
| Enter state mode | enter state |
| List available commands | ? or ?? (global commands too) |
3.2 Basic Configuration, Exploring & Modifying an Existing BGP Setup#
SR Linux uses a candidate configuration datastore model, changes are staged in the candidate configuration and only become active after a commit command is issued. This means you can safely explore and modify the candidate without impacting the running network until you are ready.
In this task, BGP is already configured and running on all SR Linux nodes. Your goal is to inspect the existing configuration, understand its structure in the SR Linux CLI, make targeted modifications, and safely commit those changes.
-
Enter configuration mode and inspect the existing BGP configuration:
Enter candidate mode and navigate to the BGP context for the default network instance.
navigate to BGP context
Use
infoto display the current candidate configuration from this context. You should see the existing BGP groups and neighbors already configured.info bgp
--{ + candidate shared default }--[ network-instance default protocols bgp ]--
A:admin@g1-leaf21# info
    autonomous-system 4200002001
    router-id 10.46.1.43
    dynamic-neighbors {
        interface ethernet-1/31.0 {
            peer-group spine
            allowed-peer-as [
                4200002000
            ]
        }
        interface ethernet-1/32.0 {
            peer-group spine
            allowed-peer-as [
                4200002000
            ]
        }
    }
    ebgp-default-policy {
        import-reject-all false
        export-reject-all false
    }
    afi-safi evpn {
        multipath {
            allow-multiple-as true
            ebgp {
                maximum-paths 64
            }
            ibgp {
                maximum-paths 64
            }
        }
        evpn {
            rapid-update true
        }
    }
    afi-safi ipv4-unicast {
        admin-state enable
        multipath {
            allow-multiple-as true
            ebgp {
                maximum-paths 32
            }
            ibgp {
                maximum-paths 32
            }
        }
        ipv4-unicast {
            advertise-ipv6-next-hops true
            receive-ipv6-next-hops true
        }
    }
    afi-safi ipv6-unicast {
        admin-state enable
        multipath {
            allow-multiple-as true
            ebgp {
                maximum-paths 32
            }
            ibgp {
                maximum-paths 32
            }
        }
    }
    transport {
        mtu-discovery true
    }
    group iBGP-DC {
        next-hop-self true
        peer-as 65000
        afi-safi evpn {
            admin-state enable
        }
        afi-safi ipv4-unicast {
            admin-state disable
        }
        afi-safi ipv6-unicast {
            admin-state disable
        }
        local-as {
            as-number 65000
            prepend-global-as false
        }
        timers {
            connect-retry 1
            minimum-advertisement-interval 1
        }
        transport {
            local-address 10.46.1.43
        }
    }
    group spine {
        export-policy [
            local
        ]
    }
    neighbor fd00:fde8::1:13 {
        peer-group iBGP-DC
    }
Use
info detailto also see default values that are not explicitly configured. -
Inspect the running configuration and compare:
Use
info from runningto see what is currently active on the router, then usediffto confirm there are no pending changes before you start.diff
No output from
diffmeans the candidate and running configurations are identical, a clean starting point. -
Modify an existing BGP neighbor:
Make a targeted change to an existing neighbor, for example, add a description and a local-preference value to one of the neighbors.
Use
diffto review your staged changes before committing.modify configuration
--{ + candidate shared default }--[ network-instance default protocols bgp ]--
A:admin@g1-leaf21# neighbor fd00:fde8::1:13 description "iBGP-DC overlay peer to vRR"


--{ +* candidate shared default }--[ network-instance default protocols bgp ]--
A:admin@g1-leaf21# neighbor fd00:fde8::1:13 local-preference 170


--{ +* candidate shared default }--[ network-instance default protocols bgp ]--
A:admin@g1-leaf21# diff
    neighbor fd00:fde8::1:13 {
+         description "iBGP-DC overlay peer to vRR"
+         local-preference 170
    }
The
*in the prompt indicates there are uncommitted changes in the candidate configuration. -
Validate and commit:
Before committing, validate the candidate configuration using the
commit validatecommand to catch any errors.commit
--{ +* candidate shared default }--[ network-instance default protocols bgp ]--
A:admin@g1-leaf21# commit validate
All changes are valid.


--{ +* candidate shared default }--[ network-instance default protocols bgp ]--
A:admin@g1-leaf21# commit now
All changes have been committed. Leaving candidate mode.


--{ + running }--[ network-instance default protocols bgp ]--
A:admin@g1-leaf21#
After a successful commit, the
*disappears from the prompt and the mode switches back torunning, confirming the running configuration now matches the committed candidate.Alternatively, use
commit stayto commit and stay in the candidate mode if you want to continue making config changes. -
Discard unwanted changes:
If you want to undo staged changes without committing them, use the
discardcommand. For example, to discard all changes in the current candidate session:The
staykeyword discards all changes but keeps you in candidate mode so you can continue editing. Thenowkeyword discards changes and exits candidate mode.If you want to undo a specific change without discarding everyting, use the
discardcommand with a specific YANG path.You can also use
load startupto fully reset the candidate to the startup configuration:
3.3 Output Modifiers, Wildcards & CLI Aliasing#
The SR Linux CLI supports environment customization at the session level, including command aliases, output modifiers, and powerful wildcard/range expressions.
-
Use the
| asoutput modifier to convert output to JSON, XML or YAMLThe
| as json,| as xmland| as yamlmodifiers transforminfooutput into structured formats, useful for scripting and automation.info | as json
-
Use wildcards and ranges for bulk configuration and queries
Wildcards (
*) and ranges ({x..y}) allow you to target multiple YANG list elements in a single command, a powerful capability for bulk configuration and state inspection.wildcard and range examples
# View admin-state for interfaces 1 through 4
info interface ethernet-1/{1..4} admin-state

# View traffic rates for all interfaces in table format
info from state interface * traffic-rate | filter fields in-bps out-bps | as table

# Enable interfaces 5 through 10 in a single command
interface ethernet-1/{5..10} admin-state enable

# Set a description on a set of interfaces
interface ethernet-1/{1,3..5,8} description "configured with range"
changing configuration using ranges
--{ candidate shared default }--[  ]--
A:admin@g1-leaf21# interface ethernet-1/{5..10} admin-state enable

--{ * candidate shared default }--[  ]--
A:admin@g1-leaf21# diff
+     interface ethernet-1/5 {
+         admin-state enable
+     }
+     interface ethernet-1/6 {
+         admin-state enable
+     }
+     interface ethernet-1/7 {
+         admin-state enable
+     }
+     interface ethernet-1/8 {
+         admin-state enable
+     }
+     interface ethernet-1/9 {
+         admin-state enable
+     }
+     interface ethernet-1/10 {
+         admin-state enable
+     }

--{ * candidate shared default }--[  ]--
A:admin@g1-leaf21# commit now
3.3.1 Output Modifiers Reference#
| Modifier | Description |
|---|---|
| more | Paginate output |
| as json | Transform output to JSON format |
| as yaml | Transform output to YAML format |
| as table | Transform output to table format |
| grep <str> | Filter output lines matching a string |
| head <n> | Show first N lines |
| tail <n> | Show last N lines |
| jq <expr> | Transform JSON output using jq |
| yq <expr> | Transform YAML output using yq |
3.3.2 What Are Aliases?#
Aliases allow operators to define custom command names that map to longer SR Linux CLI commands.
-
Create a navigation shortcut alias
-
Create an alias with output modifiers
configure alias with modifier
--{ + running }--[ ]-- A:admin@g1-leaf21# traffic-rate +---------------------+----------------------+----------------------+ | Interface | In-bps | Out-bps | +=====================+======================+======================+ | ethernet-1/1 | 0 | 164 | | ethernet-1/2 | 989 | 1186 | | ethernet-1/3 | | | | ethernet-1/4 | | | | ethernet-1/5 | | | | ethernet-1/6 | | | | ethernet-1/7 | | | | ethernet-1/8 | | | | ethernet-1/9 | | | | ethernet-1/10 | | | | ethernet-1/11 | | | | ethernet-1/12 | | | | ethernet-1/13 | | | | ethernet-1/14 | | | | ethernet-1/15 | | | | ethernet-1/16 | | | | ethernet-1/17 | | | | ethernet-1/18 | | | | ethernet-1/19 | | | | ethernet-1/20 | | | | ethernet-1/21 | | | | ethernet-1/22 | | | | ethernet-1/23 | | | | ethernet-1/24 | | | | ethernet-1/25 | | | | ethernet-1/26 | | | | ethernet-1/27 | | | | ethernet-1/28 | | | | ethernet-1/29 | | | | ethernet-1/30 | | | | ethernet-1/31 | 320 | 323 | | ethernet-1/32 | 457 | 323 | | ethernet-1/33 | | | | ethernet-1/34 | | | | irb0 | | | | lag1 | 989 | 1186 | | mgmt0 | 12667 | 284334 | | system0 | | | +---------------------+----------------------+----------------------+ -
Create an alias with an argument
configure alias with an argument
--{ + running }--[  ]--
A:admin@g1-leaf21# bgp-neighbor fd00:fde8::1:13
------------------------------------------------------------------------------------------------------------------------
BGP neighbor summary for network-instance "default"
Flags: S static, D dynamic, L discovered by LLDP, B BFD enabled, - disabled, * slow
------------------------------------------------------------------------------------------------------------------------
------------------------------------------------------------------------------------------------------------------------
+------------+------------+------------+------------+------------+------------+------------+------------+------------+
|  Net-Inst  |    Peer    |   Group    |   Flags    |  Peer-AS   |   State    |   Uptime   |  AFI/SAFI  | [Rx/Active |
|            |            |            |            |            |            |            |            |    /Tx]    |
+============+============+============+============+============+============+============+============+============+
| default    | fd00:fde8: | iBGP-DC    | S          | 65000      | establishe | 4d:4h:58m: | evpn       | [58/58/23] |
|            | :1:13      |            |            |            | d          | 13s        |            |            |
+------------+------------+------------+------------+------------+------------+------------+------------+------------+
------------------------------------------------------------------------------------------------------------------------
Summary:
1 configured neighbors, 1 configured sessions are established, 0 disabled peers
2 dynamic peers
Now that you are familiar with alias definition in SRL CLI, try to configure following aliases:
show system-logsshow system logging buffer systemdisplay up-intdisplay interfaces in the oper-state up
3.4 Checkpoint & Rollback#
SR Linux supports configuration rollback via checkpoint files. This allows operators to revert to a previous known-good configuration with minimal service impact.
3.4.1 Key Behaviors#
- Checkpoints are created explicitly by operators or automatically by the system (e.g., before a commit).
- The special
startupcheckpoint always reflects the startup configuration. - Rolling back with
load checkpointstages the checkpoint as the new candidate, a subsequentcommitis required to apply it. - Checkpoints are stored in state under
/system/configuration/checkpoint[id=<name>]. - Each checkpoint is stored with an
id, whereid = 0represents the most recent checkpoint.
-
Save a named checkpoint before making changes
-
Make configuration changes, then revert
Make some configuration changes (e.g., modify a BGP neighbor). Then load the checkpoint to revert.
load checkpoint
Review the
diffto confirm that the revert staged the expected changes, thencommit. -
Revert to the startup configuration
The special
startupcheckpoint always reflects the startup (boot) configuration and can be used to fully reset the node.load startup checkpoint
Note
load startup auto-commitboth loads the startup checkpoint and commits it in a single step, bypassing the normal candidate review workflow. Use with care. -
List available checkpoints
3.4.2 Operational Best Practices#
| Scenario | Recommended Action |
|---|---|
| Before major service changes | tools system configuration generate-checkpoint |
| Before committing large changes | Review with diff first |
| Scheduled maintenance | Generate a named checkpoint at the start of the window |
| Enable auto-checkpoint | Configuration checkpoint will be automatically created after every successful commit |
| Revert to known-good state | load checkpoint <name> then commit now |
| Full reset to startup configuration | load startup auto-commit |
4. Summary#
Congratulations! You have completed the activity.
If you completed all the tasks above, you have gone through a progressive learning path; from orientation and navigation, through configuration, to productivity features (aliases, output modifiers, wildcards) and operational resilience (rollback).
Here is a short summary table of some topics you have covered:
| Concept | SR Linux CLI Approach |
|---|---|
| Configuration mode | enter candidate (transactional, candidate-based) |
| Apply changes | commit or commit now |
| Undo uncommitted changes | discard or discard stay |
| Inspect staged changes | diff |
| View operational state | enter state, then info |
| Structured output formats | | as json, | as yaml, | as table |
| CLI shortcuts | environment alias |
| Bulk config / queries | Wildcards (*) and ranges ({x..y}) |
| Rollback | load checkpoint <name> then commit now |
| Reset to startup | load startup auto-commit |