Realtime monitoring via gNMI#
| Activity name | Realtime monitoring via gNMI |
| Activity ID | 26 |
| Short Description | Explore SR Linux and gNMI using get and subscribe operations. |
| Difficulty | Beginner |
| Tools used | gNMIc |
| Topology Nodes | Leaf21, Spine21 |
| References | SR Linux documentation portal Learn SR Linux YANG Browser |
You are a network engineer operating a modern SR Linux-based data center fabric. You have been assigned to remotely support the field team during a maintenance task to replace a degraded cable between a leaf and a spine. During this activity, you will use gNMI to observe changes in BGP neighbors while the physical work is being executed, continuously monitoring the connectivity between the leaf and spine as the cable replacement takes place.
To perform this task, you will use the gnmic tool.
gNMIc user guide
You can refer to the gNMIc documentation to learn how to use the gnmic command.
See the command syntax below:
To help you get started without digging into the documentation too deeply, let's identify some flags to be used on the activity.
Available Commands (filtered):
  capabilities query targets gnmi capabilities
  get          run gnmi get on targets
  help         Help about any command
  set          run gnmi set on targets
  subscribe    subscribe to gnmi updates on targets
  version      show gnmic version

Flags (filtered):
  -a, --address strings                     comma separated gnmi targets addresses
  -e, --encoding string                     one of ["json" "bytes" "proto" "ascii" "json_ietf"]. Case insensitive (default "json")
      --insecure                            insecure connection
  -p, --password string                     password
      --path                                YANG path
  -u, --username string                     username
Note
We will be working with SR Linux release 26.3.1. In this version, the default JSON encoding is not available, so a valid encoding must be explicitly specified in every command we run.
gNMIc tool
It is recomended that this activity is performed on the hackathon instance since the tool is preinstalled.
Information on how to install gNMIc can be found on the installation page.
Note: Windows users should use WSL on Windows and install the linux version of the tool.
1. Main objectives of the activity#
The main objectives of this hands-on activity are to learn how to use gNMIc while working in a maintenance window performing a simple network cable replacement. You will:
- Learn how to use the gNMIc command to connect to a router
- Learn how to get information from a YANG modelled path in the router
- Learn how to subscribe to a YANG modelled path so any updates are automatically observed
2. Tasks#
You should read these tasks from top-to-bottom before beginning the activity.
It is tempting to skip ahead but tasks may require you to have completed previous tasks before tackling them.
Warning
During this activity, please use the data center that is not connected to EDA, specifically Leafs 21 to 23 and Spines 21 to 22. This ensures a safe and isolated environment for the exercises.

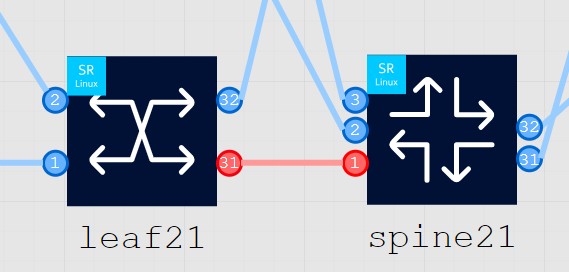
Your task is to replace the cable between leaf21 and spine21, check the connection marked in red bellow.
2.1 Task 1: Validate the gRPC configuration#
In this task you will confirm the configuration on the router has gRPC and gNMI enabled and you will familiarize yourself with the interface configuration.
We will be using leaf21 for this.
To ensure you can connect using the gnmic tool from the hackathon instance to leaf21, you should first verify that leaf21 is properly configured for gNMI access.
Specifically, confirm the following:
- The gRPC server is enabled on leaf21
- You know which port the gRPC server is using (commonly 57400, but it may differ depending on configuration)
- The gNMI service is enabled under the gRPC server
From the output, you should be able to confirm that all prerequisites on the router are correctly configured.
You may have noticed, that TLS configuration has not been specified. This means that you can use gRPC and gNMI over an insecure connection. This is ideal for this hackathon, however, in an operational environment you should always secure your gRPC connection.
Once you have validated these prerequisites, you will be able to establish a successful gNMI session from the hackathon instance to leaf21 using gnmic.
2.2 Task 2: Test the gNMI connection#
You may use leaf21 or spine21 (or both) for the gNMI connection.
To test the connection, perform a gNMI get to retrieve the device hostname from the path
This will allow you to verify connectivity and confirm that you can successfully retrieve operational data from each device.
Once you confirm you can make the gNMI connection you can continue to the next task.
2.3 Task 3: Subscribe to live telemetry streaming#
You are now going to complete the planned works activity, but you need to see what is going on with the network as you progress. To do this you are going to enable streaming telemetry using the gNMI service running over the gRPC protocol.
You will monitor the BGP neighbor session status to monitor when BGP connectivity is working again between the leaf and spine devices. If you need assistance to identify the YANG modelled paths for BGP neighbors, or you would just like to browse the YANG modelled paths that can be streamed take a look in the expandable box below.
gNMI path YANG browser
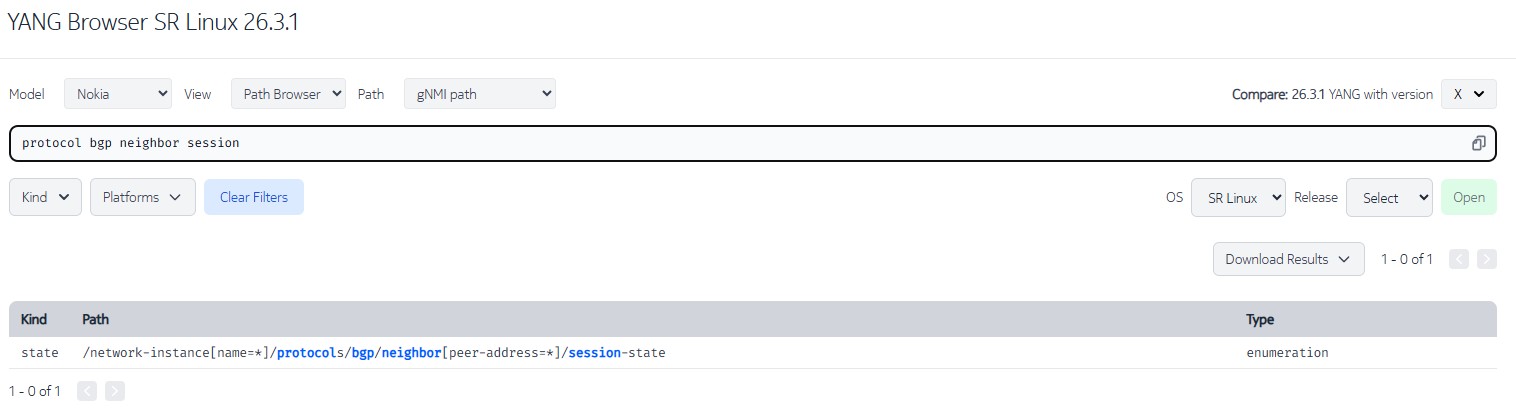
To know the gNMI path for the protocol bgp neighbor session status it is better to explore the YANG Browser of the equipment we are working on. You can find the detailed information on the YANG Browser.
Since we are looking for gNMI paths and the idea is to get state information, you should ensure the options marked on the image bellow are selected.
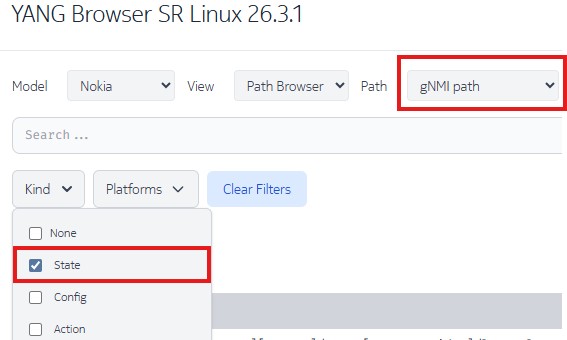
Use the search bar to find the path to the BGP neighbor's session state. Record this path somewhere for use in a moment.
An alternative option to retrieve the gNMI path (xpath) is to use the SR Linux CLI pwc xpath command. For example:
--{ running }--[  ]--
A:root@g51-leaf21# enter state

--{ state }--[  ]--
A:root@g51-leaf21# network-instance default protocols bgp neighbor fe80::1817:3ff:feff:1%ethernet-1/31.0

--{ state }--[ network-instance default protocols bgp neighbor fe80::1817:3ff:feff:1%ethernet-1/31.0 ]--
A:root@g51-leaf21# pwc xpath
/network-instance[name=default]/protocols/bgp/neighbor[peer-address=fe80::1817:3ff:feff:1%ethernet-1/31.0]
This time, since we want to monitor in real time, we will use the subscribe instead of the get operation that was used earlier to test the gNMI connection and we will target spine21
nokia@hack1:~$ gnmic -a clab-srexperts-spine21:57400 -u admin -p $EVENT_PASSWORD --encoding ascii --insecure subscribe --path "/network-instance[name=*]/protocols/bgp/neighbor[peer-address=*]/session-state"
{
  "source": "clab-srexperts-spine21:57400",
  "subscription-name": "default-1775831179",
  "timestamp": 1775831179922986261,
  "time": "2026-04-10T14:26:19.922986261Z",
  "updates": [
    {
      "Path": "network-instance[name=default]/protocols/bgp/neighbor[peer-address=fe80::1817:14ff:feff:1f%ethernet-1/2.0]/session-state",
      "values": {
        "network-instance/protocols/bgp/neighbor/session-state": "established"
      }
    }
  ]
}
{
  "source": "clab-srexperts-spine21:57400",
  "subscription-name": "default-1775831179",
  "timestamp": 1775831179924148310,
  "time": "2026-04-10T14:26:19.92414831Z",
  "updates": [
    {
      "Path": "network-instance[name=default]/protocols/bgp/neighbor[peer-address=fe80::182d:13ff:feff:1f%ethernet-1/1.0]/session-state",
      "values": {
        "network-instance/protocols/bgp/neighbor/session-state": "established"
      }
    }
  ]
}
{
  "source": "clab-srexperts-spine21:57400",
  "subscription-name": "default-1775831179",
  "timestamp": 1775831179924270245,
  "time": "2026-04-10T14:26:19.924270245Z",
  "updates": [
    {
      "Path": "network-instance[name=default]/protocols/bgp/neighbor[peer-address=fe80::188d:15ff:feff:1f%ethernet-1/3.0]/session-state",
      "values": {
        "network-instance/protocols/bgp/neighbor/session-state": "established"
      }
    },
    {
      "Path": "network-instance[name=default]/protocols/bgp/neighbor[peer-address=fe80::1e0b:19ff:fe00:0%ethernet-1/31.0]/session-state",
      "values": {
        "network-instance/protocols/bgp/neighbor/session-state": "established"
      }
    },
    {
      "Path": "network-instance[name=default]/protocols/bgp/neighbor[peer-address=fe80::1e7b:1cff:fe00:0%ethernet-1/32.0]/session-state",
      "values": {
        "network-instance/protocols/bgp/neighbor/session-state": "established"
      }
    }
  ]
}
{
  "sync-response": true
}
You can see, in real-time, the output of the status of all BGP peering configured on spine21.
You can check that the gNMI subscription is active by logging into spine21 in another window and executing the following command:
--{ running }--[  ]--
A:admin@g2-spine21# info from state system grpc-server insecure-mgmt
(truncated)
    client 941 {
        type gnmi
        user admin
        user-agent "gNMIc/0.45.0 grpc-go/1.78.0"
        remote-host 10.128.2.1
        remote-port 57670
        start-time "2026-04-15T14:12:43.785Z (a minute ago)"
        gnmi {
            paths 1 {
                path "/network-instance[name=*]/protocols/bgp/neighbor[peer-address=*]/session-state/..."
                mode TARGET_DEFINED
            }
        }
    }
Leave the telemetry stream running in your first window and use gnmic to disable the link between leaf21 and spine21.
Refer to the diagram earlier in this activity to check the ports on both nodes.
Solution: Disable the link between leaf21 and spine21.
Disable both sides of the link:
- leaf21 port
ethernet-1/31 - spine21 port
ethernet-1/1
Use these gnmic commands to disable the ports.
### leaf21 - set status disable
gnmic -a clab-srexperts-leaf21:57400 -u admin -p $EVENT_PASSWORD --insecure -e json_ietf set \
--update-path '/interface[name=ethernet-1/31]/admin-state' --update-value disable
### spine21 - set status disable
gnmic -a clab-srexperts-spine21:57400 -u admin -p $EVENT_PASSWORD --insecure -e json_ietf set \
--update-path '/interface[name=ethernet-1/1]/admin-state' --update-value disable
Observe the changes in the streaming telemetry output in your other window.
Output: Example streaming telemetry output
{
  "source": "clab-srexperts-spine21:57400",
  "subscription-name": "default-1775831179",
  "timestamp": 1775831313432146723,
  "time": "2026-04-10T14:28:33.432146723Z",
  "updates": [
    {
      "Path": "network-instance[name=default]/protocols/bgp/neighbor[peer-address=fe80::182d:13ff:feff:1f%ethernet-1/1.0]/session-state",
      "values": {
        "network-instance/protocols/bgp/neighbor/session-state": "idle"
      }
    }
  ]
}
{
  "source": "clab-srexperts-spine21:57400",
  "subscription-name": "default-1775831179",
  "timestamp": 1775831313432607189,
  "time": "2026-04-10T14:28:33.432607189Z",
  "deletes": [
    "network-instance[name=default]/protocols/bgp/neighbor[peer-address=fe80::182d:13ff:feff:1f%ethernet-1/1.0]/session-state"
  ]
}
You can see that the BGP neighbor has transitioned to idle and was then removed.
Now, use gnmic to re-enable the port on the leaf and observe the changes in the real-time telemetry stream.
Solution: Enable the link between leaf21 and spine21.
Use these gnmic commands to disable the ports.
### leaf21 - set status disable
gnmic -a clab-srexperts-leaf21:57400 -u admin -p $EVENT_PASSWORD --insecure -e json_ietf set \
--update-path '/interface[name=ethernet-1/31]/admin-state' --update-value enable
### spine21 - set status disable
gnmic -a clab-srexperts-spine21:57400 -u admin -p $EVENT_PASSWORD --insecure -e json_ietf set \
--update-path '/interface[name=ethernet-1/1]/admin-state' --update-value enable
Output: Example streaming telemetry output
{
  "source": "clab-srexperts-spine21:57400",
  "subscription-name": "default-1776088932",
  "timestamp": 1776089048392299045,
  "time": "2026-04-13T14:04:08.392299045Z",
  "updates": [
    {
      "Path": "network-instance[name=default]/protocols/bgp/neighbor[peer-address=fe80::182d:13ff:feff:1f%ethernet-1/1.0]/session-state",
      "values": {
        "network-instance/protocols/bgp/neighbor/session-state": "opensent"
      }
    }
  ]
}
{
  "source": "clab-srexperts-spine21:57400",
  "subscription-name": "default-1776088932",
  "timestamp": 1776089048394957326,
  "time": "2026-04-13T14:04:08.394957326Z",
  "updates": [
    {
      "Path": "network-instance[name=default]/protocols/bgp/neighbor[peer-address=fe80::182d:13ff:feff:1f%ethernet-1/1.0]/session-state",
      "values": {
        "network-instance/protocols/bgp/neighbor/session-state": "openconfirm"
      }
    }
  ]
}
{
  "source": "clab-srexperts-spine21:57400",
  "subscription-name": "default-1776088932",
  "timestamp": 1776089048406717558,
  "time": "2026-04-13T14:04:08.406717558Z",
  "updates": [
    {
      "Path": "network-instance[name=default]/protocols/bgp/neighbor[peer-address=fe80::182d:13ff:feff:1f%ethernet-1/1.0]/session-state",
      "values": {
        "network-instance/protocols/bgp/neighbor/session-state": "established"
      }
    }
  ]
}
This output shows a successful BGP session re-establishment sequence on spine21 after the interface change. You can observe the real-time state transitions delivered via the gNMI Subscribe stream:
-
opensent: BGP session is actively trying to establish and has sent an OPEN message
-
openconfirm: OPEN exchange completed, waiting for final confirmation
-
established: BGP session is fully up and operational
This confirms that:
- The physical link is back up
- The BGP adjacency has successfully recovered
- The gNMI subscription is correctly streaming state changes in real time
3. Conclusion#
Congratulations! You have successfully completed your planned works activity simulating a cable swap on the network. By completing this activity, you have successfully:
- Learned how to use the gNMIc tool.
- Learned how to navigate the Nokia YANG browser to search for valid gNMI paths.
- Used the gRPC protocol and the gNMI service to get data from an SR Linux router using the open source
gnmicutility. - Used the gRPC protocol and the gNMI service to to subscribe to a real-time telemetry monitoring stream from an SR Linux router to observe BGP peering state changes.