1. Service Automation using Python#
| Short Description | Define an EDA virtual network integrating Layer 2/3 services using Python |
| Difficulty | Advanced |
| Tools used | Python, Pydantic |
| Topology Nodes | client11, client12, client13, leaf11, leaf12, leaf13 |
| References | EDA API Guide, OpenAPI Swagger spec, Pydantic EDA |
This is the final exercise in a four-part series on using EDA to automate datacenter overlay connectivity services. In this step, you will create the Virtual Network from Part 3 against, but this time using Python and EDA's REST API instead of clicking through the UI.
- Part 1: achieve layer-2 connectivity using bridge domains
- Part 2: achieve layer-3 connectivity using routers
- Part 3: combine layer-2 and layer-3 connectivity through a single EDA object: the Virtual Network
- Part 4 (this activity): automate overlay service provisioning from Part 3 with Python, Pydantic and EDA REST API.
1.1 Objective#
This exercise shares the same goal as Part 3: enabling three Linux hosts to communicate within the same subnet (switched traffic) and across different subnets (routed traffic). However, this time you will use the EDA API with Python as the API client using generated Pydantic classes based on the EDA OpenAPI specification.
If you haven’t already completed the EDA REST API, we recommend doing so first. It offers a concise overview of key concepts that will help in understanding this exercise.
1.2 Technology explanation#
EDA API is extensible. Every EDA resource that gets added when a user installs the application, becomes extends the EDA API surface in a similar way as custom resources in Kubernetes become available through the Kubernetes API. This model provides that powerful extensibility where a system can be customized on-the-fly, by simply installing the EDA App via the EDA Store, and the app will plug its API to the common API layer of the system.
EDA's API have two API sets that users typically interact with:
- Core API
This is the EDA Core system API. Things like Transactions, Alarms, and User management are all part of the this API set.
It extends with installing a new version of the EDA platform. - Apps API
Every applications onboarded to the EDA platform (both provided by Nokia or anyone else) will extend the Apps API by adding the applications API to the common API layer.
This is how extensibility of the API is achieved in EDA.
EDA users can use any REST API client to interact with the EDA API, and in the EDA REST API exercise you had a chance to use the Postman client to interact with the EDA API. In this advanced exercise you will adopt a more sophisticated and powerful approach, you will use Python and its httpx client library as a REST API client, and for extra fun you will consume the EDA API via Pydantic models generated for the EDA OpenAPI specification.
Pydantic and OpenAPI
Pydantic is a Python library used for data validation and data parsing using Python type annotations. It’s widely used to define schemas (models) for structured data, such as the kind you get from JSON APIs. It provides automatic validation, detailed error messages and conversion of input data to Python native types.
OpenAPI (formerly Swagger) is a standard specification for documenting and defining RESTful APIs. As the specification is usually written in YAML of JSON, it can be used to generate Documentation and Client SDKs.
1.2.1 Why Pydantic?#
Why would you even use Pydantic? What's wrong with just reading the OpenAPI spec, identifying the request body and go fire off the request? The answer is simple: Pydantic makes your code more robust, easy to write and read and thus makes your life easier. Let us expand.
Without Pydantic, every request you have would look like a JSON object inside your body. But how would you create this JSON body? Manually typing it in or templating with Jinja - and you are in for a good time debugging and runtime errors the moment you make a typo, miss a required field or transition to an API that has changed.
With Pydantic, you get the native Python classes generated from the OpenAPI spec so that you can programmatically generate request bodies, get IDE support and autocompletion and validate the provided data against the OpenAPI schema before you send the requests to the server.
1.2.2 How Pydantic and OpenAPI Work Together#
Pydantic models are commonly derived from an OpenAPI specification, which outlines the structure and rules of an API:
- OpenAPI defines the expected input, output, and behavior of an API.
- Pydantic enforces those rules and provides a Pythonic way to construct and validate data.
This allows developers to work with EDA resources programmatically, avoiding the need to manually craft JSON or YAML definitions.
The Pydantic EDA community project provides the Pydantic models for EDA API. It generates them from the EDA OpenAPI specifications published in the EDA OpenAPI spec repo.
Before diving into the task of creating a Virtual Network with Python, let's first review the basics concepts behind a Pydantic model, and for that we will use one of the most basic units of automation - the Interface.
1.2.3 Interface Pydantic Model#
In EDA, all resources are schema driven, this means, that the representation of a resource may look different, but the structure is exactly the same, no matter what automation interface you use. For example, let's consider the Interface resource as it appears in the UI and in the API documentation.
In the EDA UI go to the TOPOLOGY → IInterfaces and click on leaf11-ethernet-1-49 to open the schema form.
In the other tab visit the EDA API documentation ( icon in the top right of the page) and open the Interface Application API tab.
You'll notice that the resource definition appears the same, only the format differs (YAML vs. JSON); see the screenshots below:
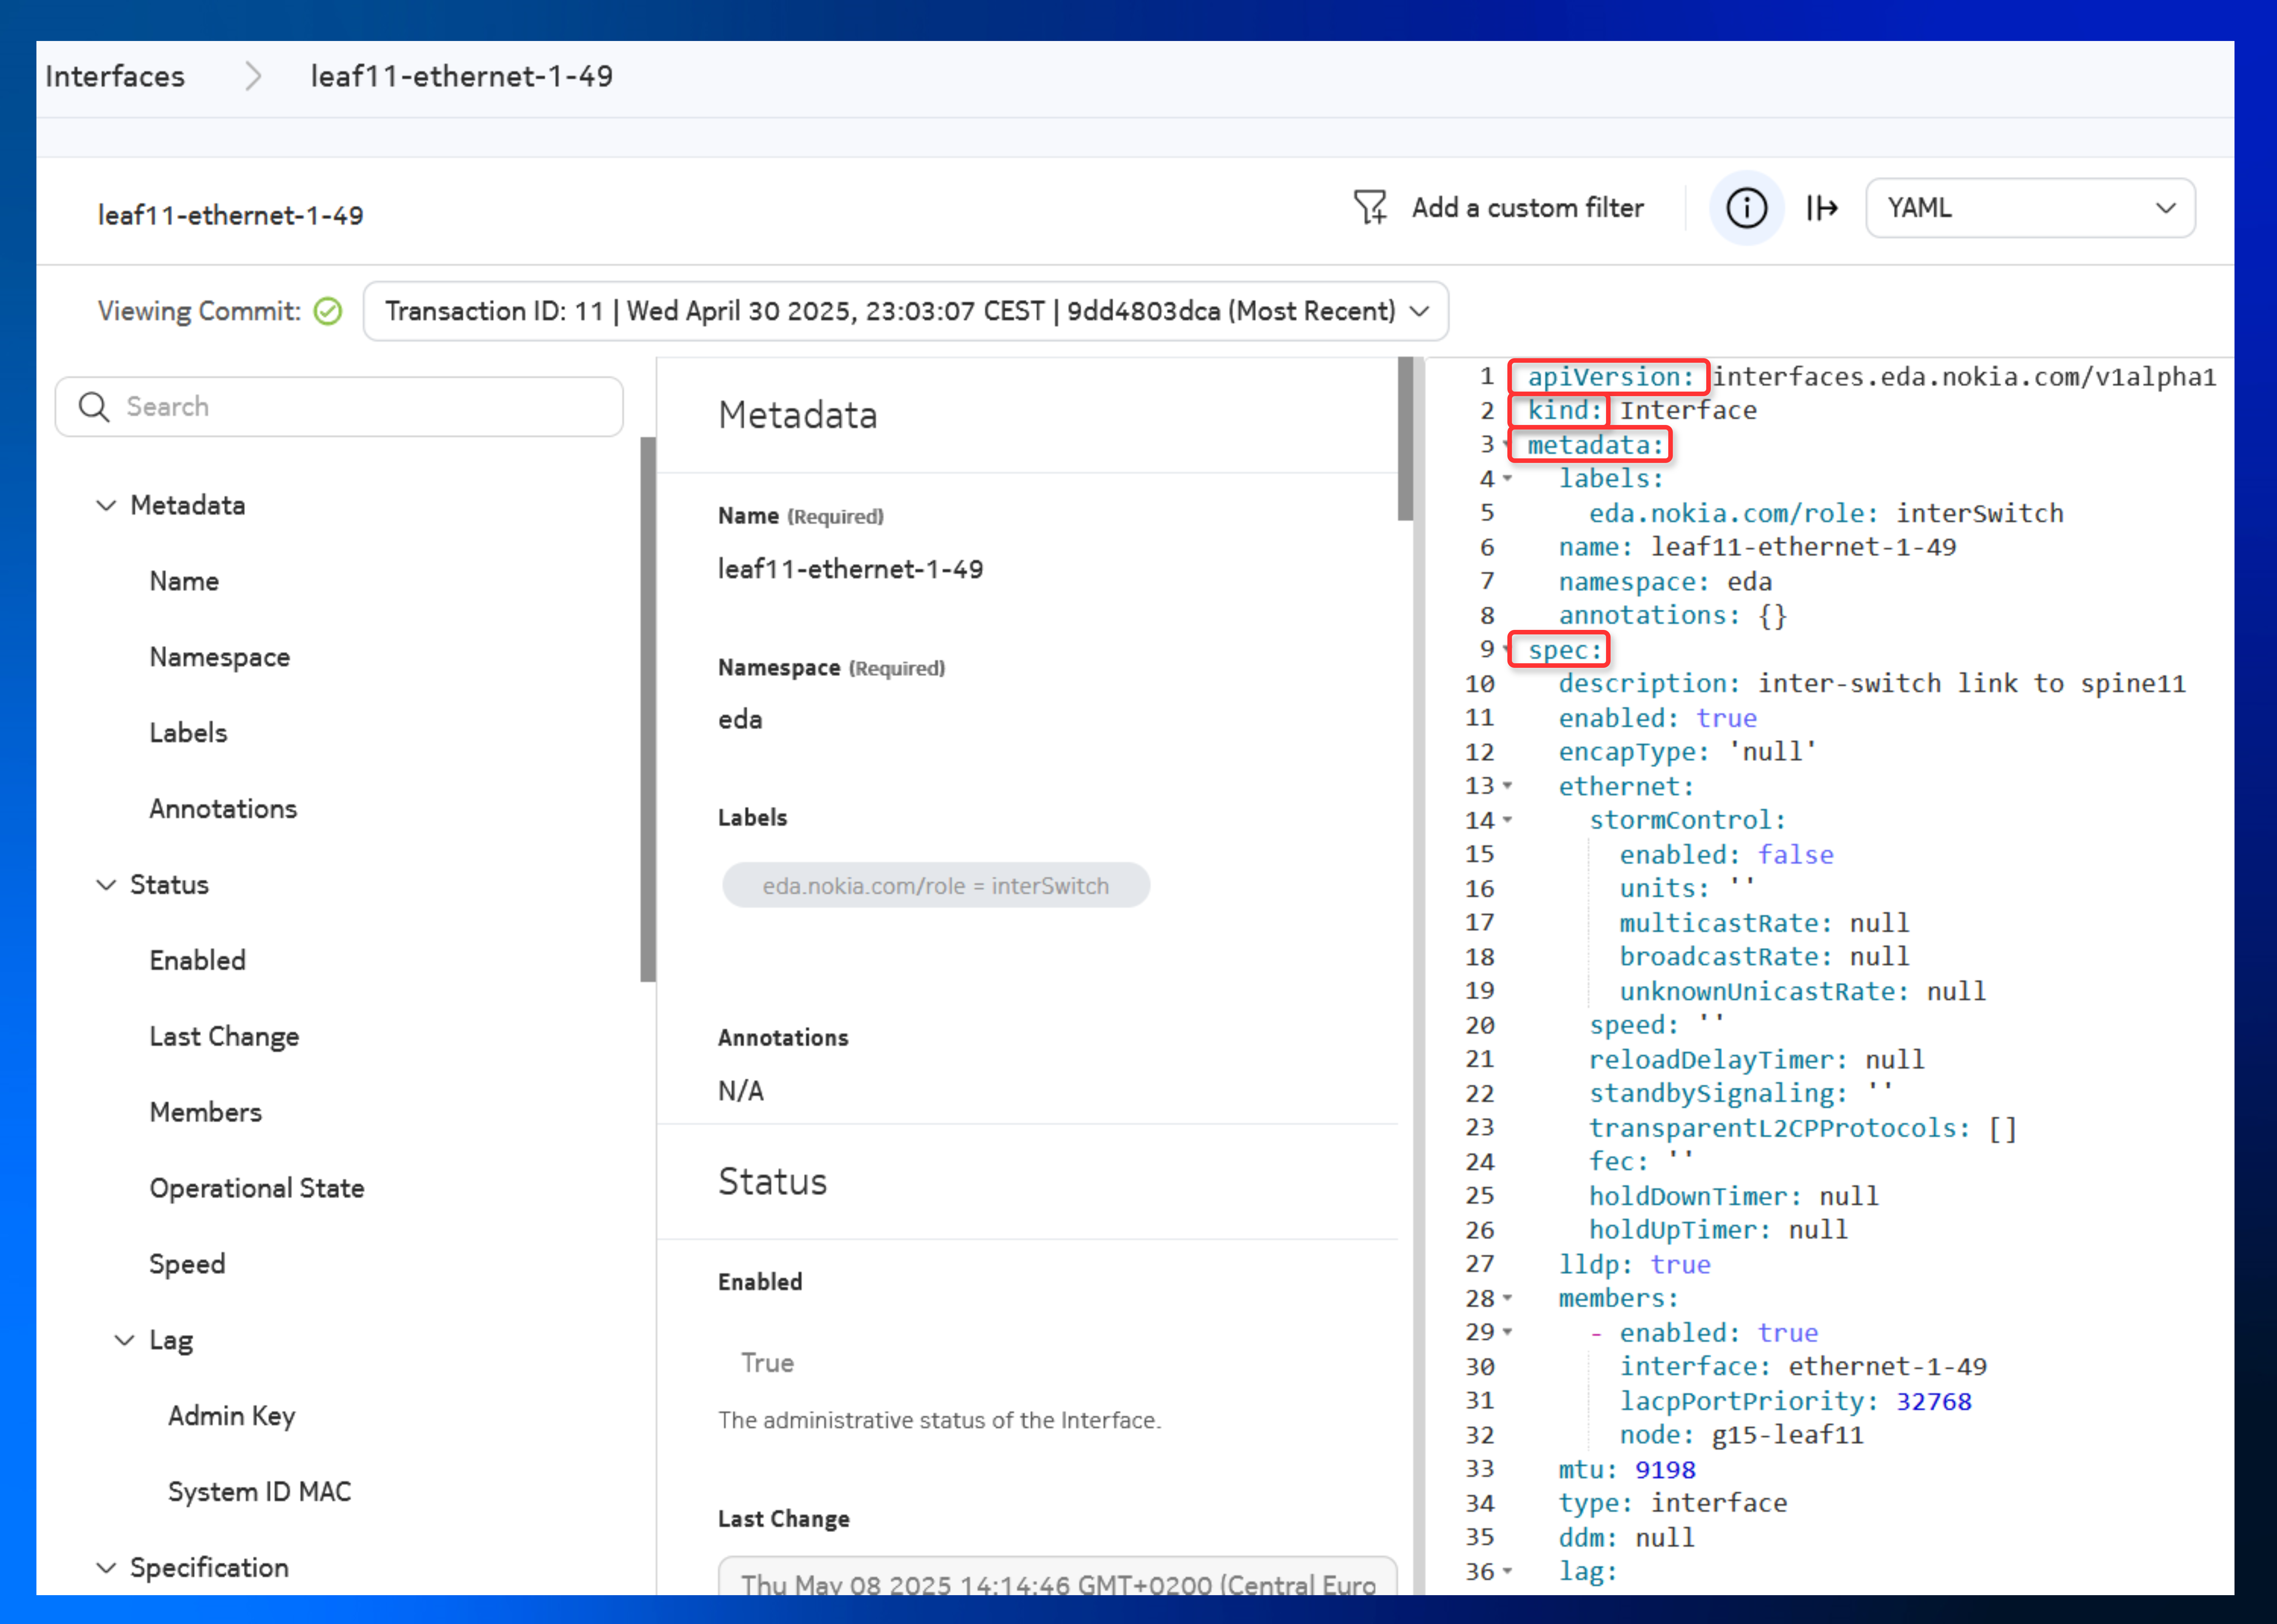
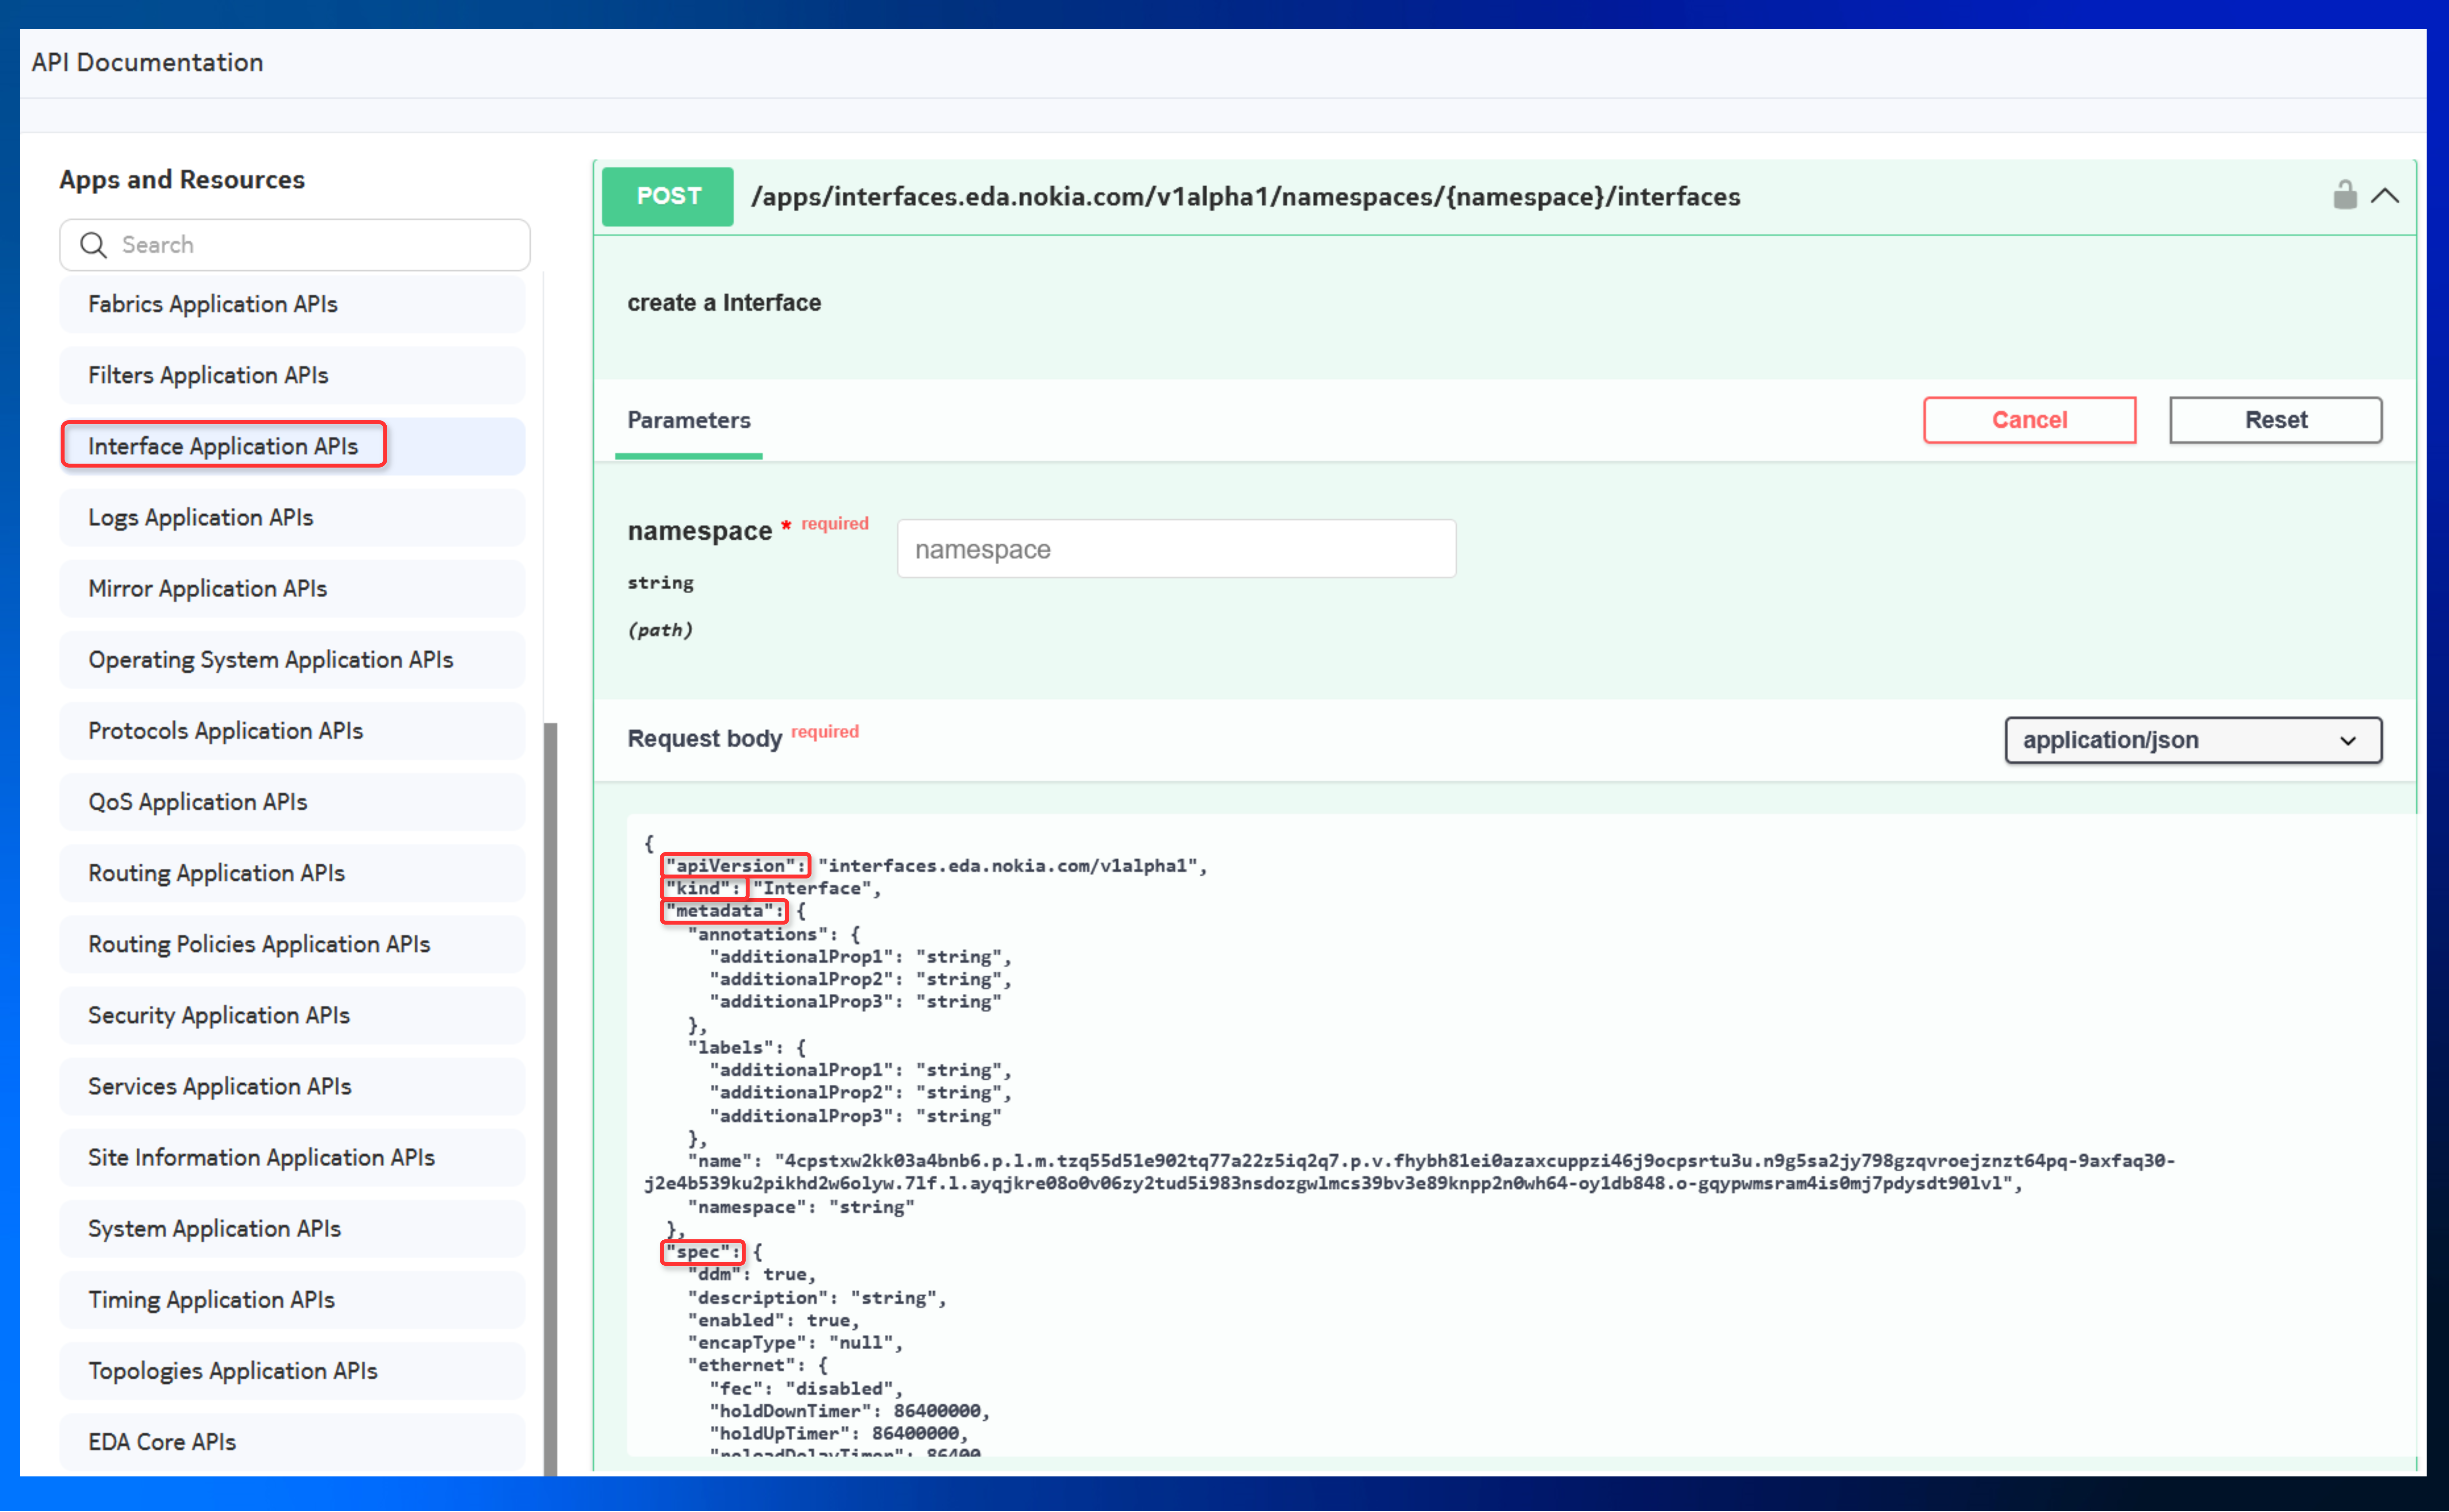
Since EDA models its resources after the Kubernetes Custom Resources (CRs), each object follows a structure familiar to Kubernetes users:
apiVersion: The API group and API version the object belongs tokind: What kind of object it ismetadata: Identification fields like anamestring and anamespace, plus auxiliary metadata likelabelsandannotations.spec: provides the specification for the resource - its configuration.status: (not shown here) provides state/status information about the resource, such as its current state, the nodes it is deployed on or health.
With Pydantic classes you can define EDA resources using native Python code, providing type validation, structure enforcement, and a more native development experience.
Let's see side by side an Interface CR and it's Pydantic definition:
import pydantic_eda.apps.interfaces.v1alpha1.models as iface # (1)!


def interface(ns: str, name: str) -> iface.Interface: #(2)!
    iface_ = iface.Interface(
        apiVersion="interfaces.eda.nokia.com/v1",
        kind="Interface",
        metadata=iface.InterfaceMetadata( #(3)!
            name=name,
            namespace=ns,
        ),
        spec=iface.InterfaceSpec(
            description="inter-switch link to spine11",
            mtu=9198,
            members=[
                iface.InterfaceSpecMember(
                    interface="ethernet-1-49",
                    node="g15-leaf11",
                ),
            ],
        ),
    )

    return iface_
- The first thing we do is importing the Pydantic classes that have been already generated by the EDA community.
- Our function takes as arguments the
namespaceand thenameof the CR, and returns the Interface object. - Metadata is modeled as a class and takes the
namespaceandnameas input. - The
specis also modeled as the InterfaceSpec class.
Click at each annotation to see a explanation of that relevant section.
The Python interface function shown is only one component of the complete code needed to fully provision a Virtual Network. It serves as a building block within a larger program. A complete Python solution includes:
- A
clientto manage the REST API connection and handle transaction creation and commit loggingfor monitoring interaction status- Additional
functionsfor defining other Pydantic-based EDA resources (e.g., Virtual Network) - A
mainroutine that orchestrates the overall workflow
For this exercise, we’ll provide these core components so you can concentrate on constructing the Pydantic model for the Virtual Network.
1.3 Tasks#
Now it's time to apply what we've learned so far and create a Virtual Network in the most pythonic way possible.
IMPORTANT
Remove any Bridge Domains, Bridge Interfaces or VLANs created in the Bridge Domains/Part 1 and the Routers/Part 2 as our Virtual Network will create them or simply reset EDA using the git time machine.
1.3.1 Setup environment#
Tip
It’s highly recommended to use a code editor with Python auto-completion and suggestions enabled, as it will significantly improve your productivity and help avoid syntax errors when working with Pydantic models.
Clone the openapi-example-python that provides the EDA API client implemented in Python. You can clone it to your own personal device or your dedicated hackathon instance VM running the lab topology.
If you're working on your local device, make sure the uv python package manager and installer is installed beforehand.
git clone  -b srx-2025 https://github.com/eda-labs/openapi-example-python.git
cd openapi-example-python
After you cloned the repository, initialize the virtual environment:
In the main.py file, configure the YOUR_EDA_EXT_DOMAIN_NAME:PORT with your EDA Web UI/API address you have been provided with.
1.3.2 Start Coding#
The project structure is the following:
openapi-example-python/
├── src/
│   ├── client.py              # Handles REST API communication and transactions
│   ├── logging.py             # Sets up logging configuration
│   └── virtualnetwork.py      # Defines Pydantic models for Virtual Network
├── main.py                    # Entry point to tie everything together
├── pyproject.toml             # Project metadata and dependencies (used by uv)
├── uv.lock                    # Lockfile with exact versions of dependencies
The client.py and logging.py files are prebuilt and ready to use.
Your task is to implement the Virtual Network definition inside the virtualnetwork.py file that is then referenced in the main.py. The virtualnetwork.py file has an import block that pulls in the generated Pydantic classes for the services application that contains the VirtualNetwork resource. By importing this module, you get access to the generated classes from the OpenAPI spec for this application.
Since you already have an idea what the virtual network resource consists of after completing the Part 3 of this challenge, you may start by typing starting to define your virtual network:
And let IDE help you identify what properties a VirtualNetwork class has. Since the Virtual Network is a composite resource that references Bridge Domains, IRBs, VLANs and so on, you will have multiple specifications in the generated Pydantic model, they will differ by the name, but to see which one is relevant for which resource might require some looking around in the provided pydantic module.
1.3.3 Test your code#
Once you have your code ready you can execute it with uv run python main.py.
If everything works correctly, you should see output similar to the following:
[*]─[~/openapi-example-python]
└──> python main.py
[05/10/25 14:34:41] INFO     Authenticating with EDA API server                                                                                                                         client.py:54
                    INFO     Adding 'VirtualNetwork' resource from 'services.eda.nokia.com/v1' to the 'create' transaction list                                                        client.py:101
                    INFO     Transaction 183 committed                                                                                                                                 client.py:160
[05/10/25 14:34:43] INFO     Transaction 183 state: complete                                                                                                                           client.py:166

[*]─[~/openapi-example-python]
You can go now to the EDA UI System → Transactions and check the details of the Transaction and see your Virtual Network in the list of Virtual Network resources.
Hint
Your function should list the specification of the bridge domains, a router, the routed interfaces and everything you used to create a VNET resource in the Part 3. You high level structure could look like this:
def virtualnetwork(ns: str, name: str) -> service.VirtualNetwork:
    vnet = service.VirtualNetwork(
        apiVersion="services.eda.nokia.com/v1",
        kind="VirtualNetwork",
        metadata=service.VirtualNetworkMetadata(
            name=name, namespace=ns, labels={"role": "exercise"}
        ),
        spec=service.VirtualNetworkSpec(
            routers=[
                router,
            ],
            routedInterfaces=[
                routed_if_client11,
                routed_if_client13,
            ],
            bridgeDomains=[
                bd_300,
                bd_312,
            ],
            vlans=[
                vlan_300,
                vlan_312,
            ],
            irbInterfaces=[
                irb_300,
                irb_312,
            ],
        ),
    )

    return vnet
1.3.4 Test the connectivity#
With the Virtual Network committed to the fabric, you should now have IP connectivity between your clients! Login to one of the clients and try to ping the IP of the other ones!
See Access Details if you need a reminder on how to access the nodes in the topology.
ping -I eth1.300 10.30.0.12ping -I eth1.311 10.30.2.12ping -I eth1.311 10.30.3.13
ping -I bond0.300 10.30.0.13ping -I bond0.312 10.30.1.11ping -I bond0.312 10.30.3.13
ping -I eth1.300 10.30.0.11ping -I eth1.313 10.30.1.11ping -I eth1.313 10.30.2.12
1.4 Summary and review#
Great job! By completing this activity, you have accomplished the following:
- Gained an understanding of how to represent EDA resources in Python using Pydantic models. In a fully modeled way, without any YANG pains.
- Converted a Virtual Network configuration from the EDA UI into structured Python code.
- Programmatically created and submitted EDA resources using the REST API.
- Worked with project scaffolding, transaction handling, and data validation.
- Automated Virtual Network provisioning, enabling consistent and reusable deployment workflows.
Possible solution Python code (only look here as a last resort!)
The solution to this challenge is provided here.
This is just one possible solution. There are many valid ways to approach these tasks. If your code achieves the desired outcome, then your solution is perfectly valid!